<?xml version="1.0" encoding="utf-8"?><feed xmlns="http://www.w3.org/2005/Atom" xml:lang="en"><generator uri="https://jekyllrb.com/" version="4.4.1">Jekyll</generator><link href="https://www.vladkhambir.com/feed.xml" rel="self" type="application/atom+xml" /><link href="https://www.vladkhambir.com/" rel="alternate" type="text/html" hreflang="en" /><updated>2026-11-20T20:53:43-05:00</updated><id>https://www.vladkhambir.com/feed.xml</id><title type="html">Vlad Khambir</title><subtitle>Vlad Khambir writes about iOS, Swift, SwiftUI, architecture, and the craft of software.</subtitle><author><name>Vlad Khambir</name><email>vlad.khambir@gmail.com</email></author><entry><title type="html">Using Windsurf Workflows to Automate the Software Development Lifecycle</title><link href="https://www.vladkhambir.com/posts/windsurf-workflows-software-development-lifecycle/" rel="alternate" type="text/html" title="Using Windsurf Workflows to Automate the Software Development Lifecycle" /><published>2025-12-26T14:00:00-05:00</published><updated>2025-12-26T14:00:00-05:00</updated><id>https://www.vladkhambir.com/posts/windsurf-workflows-software-development-lifecycle</id><content type="html" xml:base="https://www.vladkhambir.com/posts/windsurf-workflows-software-development-lifecycle/"><![CDATA[<p>AI tools are already part of everyday software development. Most teams use them for code completion, quick refactoring, or documentation lookup. However, the real productivity gains appear when AI is applied not to isolated prompts, but to <strong>repeatable engineering workflows</strong>.</p>

<p>In this article, I’ll describe how Windsurf Workflows can be structured to automate common development tasks, why context management becomes a critical factor at scale, and how patterns like <strong>Agent Skills from Claude</strong> can be applied to Windsurf workflows in practice.</p>

<h2 id="from-prompts-to-windsurf-workflows">From Prompts to Windsurf Workflows</h2>

<p>Ad-hoc prompting works well for one-off questions. But in a production environment, engineers repeatedly perform the same categories of work:</p>

<ul>
  <li>reviewing changes before opening a pull request</li>
  <li>preparing pull requests with consistent structure</li>
  <li>planning implementation based on ticket requirements</li>
  <li>addressing review feedback</li>
</ul>

<p>Each of these tasks requires context, consistency, and a predictable outcome. Repeating the same explanations to an AI agent is inefficient and increases cognitive load.</p>

<p>This is where <strong>Windsurf Workflows</strong> become useful.</p>

<p>A Windsurf Workflow is a reusable, structured prompt designed to solve a specific task in a consistent way. Instead of starting from a blank chat every time, a workflow defines inputs, expectations, and output format upfront.</p>

<h2 id="why-context-management-matters">Why Context Management Matters</h2>

<p>Modern AI agents operate within a limited context window. The more information we push into that window, the harder it becomes for the model to reason effectively.</p>

<p>When workflows grow and start interacting with external systems, poor context management can lead to:</p>

<ul>
  <li>slower responses</li>
  <li>degraded reasoning quality</li>
  <li>inconsistent results</li>
</ul>

<p>For this reason, workflow design is not only about automation, but also about <strong>separating responsibilities</strong> and keeping the AI focused on reasoning rather than integration details.</p>

<p>This becomes even more critical when using the MCP model stack: each API call consumes part of the same context window, so keeping MCP responsibilities (data fetching, system orchestration) separate from Windsurf reasoning keeps the agent responsive and predictable.</p>

<h2 id="agent-skills-as-a-design-pattern">Agent Skills as a Design Pattern</h2>

<p>A clean solution to this problem comes from <strong>Agent Skills</strong>, a concept popularized by Claude (see <a href="https://www.claude.com/blog/skills">Claude Skills</a> for details).</p>

<p>Agent Skills introduce a clear separation between three concerns:</p>

<h3 id="instructions">Instructions</h3>

<p>A concise description of what the agent should do. This is usually a Markdown document defining goals, constraints, and expected output.</p>

<h3 id="resources">Resources</h3>

<p>Static or semi-static files that provide context, such as style guides, templates, or internal documentation.</p>

<h3 id="scripts">Scripts</h3>

<p>Executable logic that interacts with external systems. Scripts fetch data, update tickets, create pull requests, or perform other side effects outside the AI context.</p>

<p>This separation allows the AI to focus on decision-making and reasoning, while scripts handle integration logic in a deterministic way.</p>

<h2 id="applying-agent-skills-to-windsurf-workflows">Applying Agent Skills to Windsurf Workflows</h2>

<p>Although Agent Skills are often associated with Claude, the same structure can be applied to Windsurf workflows:</p>

<ul>
  <li>workflows act as <strong>instructions</strong></li>
  <li>shared files act as <strong>resources</strong></li>
  <li>helper scripts handle <strong>external dependencies</strong></li>
</ul>

<p>This approach keeps workflows modular, composable, and easier to reason about. It also prevents the AI context from being overloaded with implementation details that do not require reasoning.</p>

<h2 id="workflow-ideas-instead-of-rigid-automation">Workflow Ideas Instead of Rigid Automation</h2>

<p>Rather than building workflows that fully replace engineers, this approach focuses on <strong>guidance and acceleration</strong>.</p>

<p>Examples of workflow ideas include:</p>

<ul>
  <li>generating structured feedback for code changes</li>
  <li>preparing consistent pull request descriptions</li>
  <li>creating implementation plans from ticket requirements</li>
  <li>summarizing and categorizing review feedback</li>
</ul>

<p>The key idea is not full automation, but reducing friction and standardizing routine work while keeping engineers in control.</p>

<h2 id="structuring-workflows-for-scale">Structuring Workflows for Scale</h2>

<p>To make workflows reusable across a team, they should be stored and versioned like any other engineering artifact.</p>

<p>A typical structure includes:</p>

<ul>
  <li>a dedicated repository for workflows</li>
  <li>a shared resources directory for style guides and templates</li>
  <li>a scripts directory for external integrations</li>
</ul>

<p>This structure makes workflows discoverable, maintainable, and easy to extend as new use cases appear.</p>

<h2 id="impact-on-engineering-teams">Impact on Engineering Teams</h2>

<p>Even without full automation, structured Windsurf Workflows provide tangible benefits:</p>

<ul>
  <li>reduced time spent on repetitive tasks</li>
  <li>more consistent pull requests and reviews</li>
  <li>less context switching between tools</li>
</ul>

<p>Instead of replacing engineering judgment, workflows support it by removing unnecessary overhead.</p>

<h2 id="conclusion">Conclusion</h2>

<p>AI becomes truly valuable when it is embedded into real engineering workflows, not just used as a conversational assistant.</p>

<p>By applying the <strong>Agent Skills pattern from Claude</strong> to development workflows, it is possible to build scalable, maintainable AI-powered tooling that respects context limits and integrates naturally into existing development processes.</p>

<p>For teams working on large codebases, this approach offers a practical way to improve efficiency and consistency without sacrificing control or code quality.</p>]]></content><author><name>Vlad Khambir</name><email>vlad.khambir@gmail.com</email></author><category term="development" /><category term="AI" /><category term="Automation" /><summary type="html"><![CDATA[How Windsurf Workflows can be structured to automate common development tasks and why context management becomes a critical factor at scale.]]></summary></entry><entry><title type="html">How to Migrate from UIKit to SwiftUI in Large Projects</title><link href="https://www.vladkhambir.com/posts/migrate-from-UIKit-to-SwiftUI/" rel="alternate" type="text/html" title="How to Migrate from UIKit to SwiftUI in Large Projects" /><published>2025-06-18T15:00:00-04:00</published><updated>2025-06-18T15:00:00-04:00</updated><id>https://www.vladkhambir.com/posts/migrate-from-UIKit-to-SwiftUI</id><content type="html" xml:base="https://www.vladkhambir.com/posts/migrate-from-UIKit-to-SwiftUI/"><![CDATA[<p>Switching to SwiftUI in a large codebase can feel risky. But remember how we once moved from Objective-C to Swift? From RxSwift to Combine? Now it’s time to move from UIKit to SwiftUI.
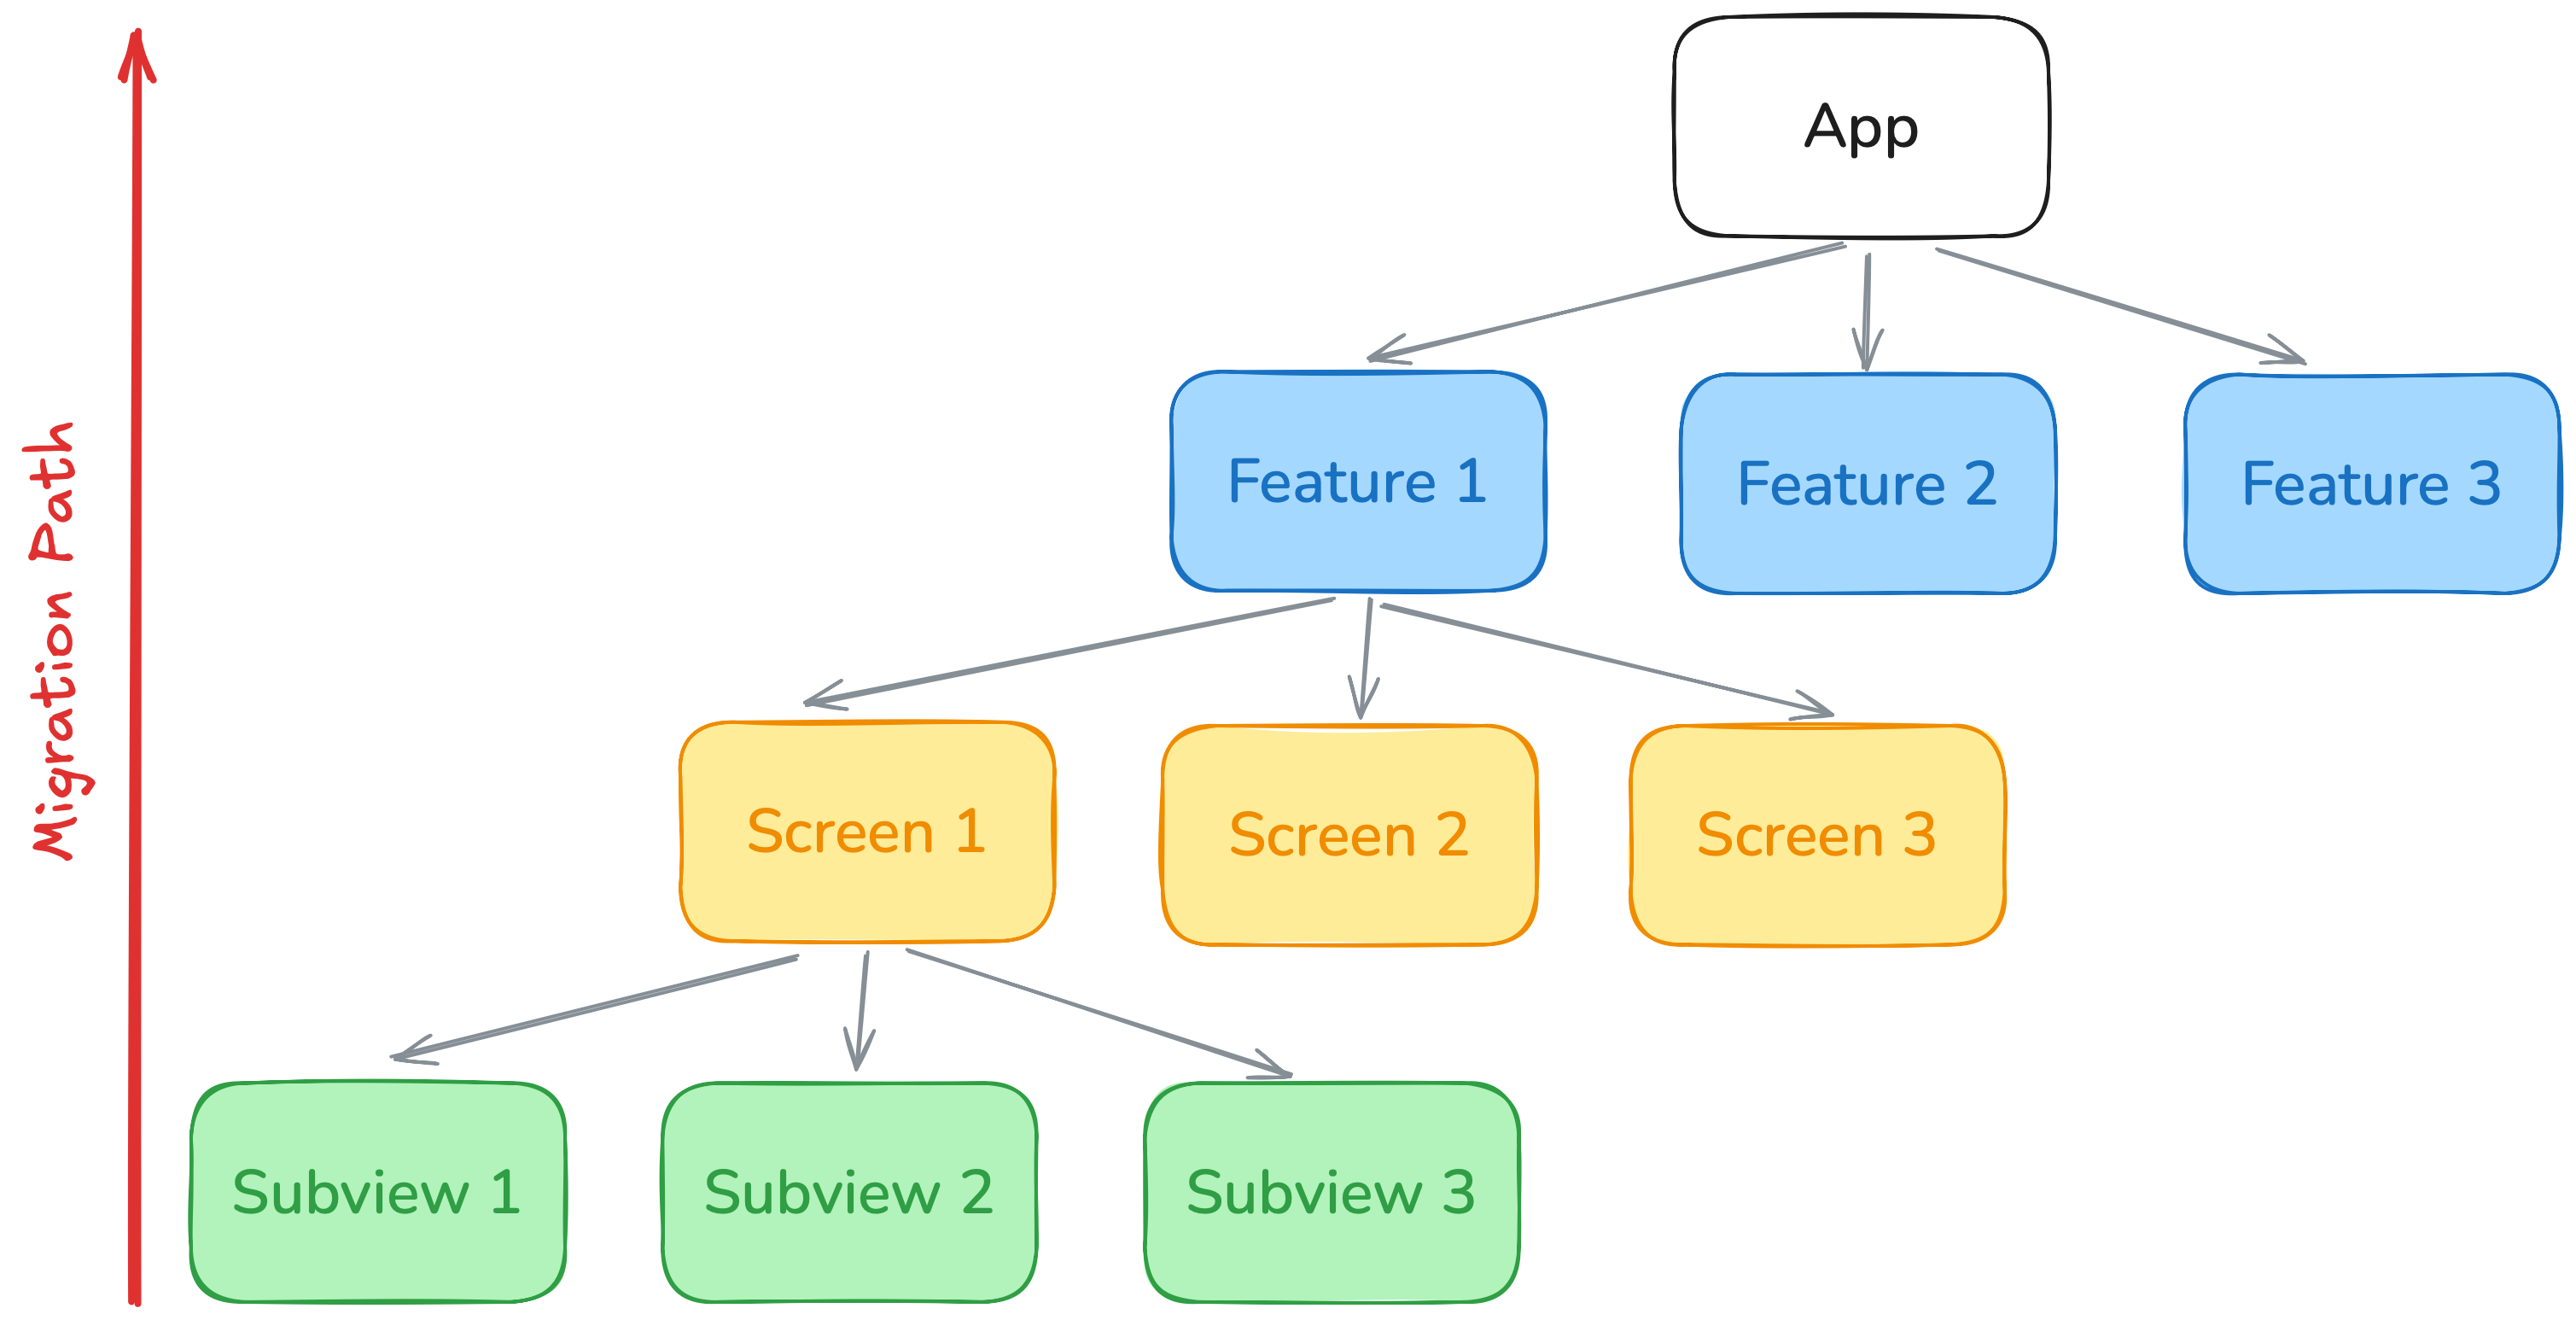
In this article, I’ll share my migration strategy called From Leaves to Root, explain the benefits of SwiftUI, and give practical advice for managing the transition inside a team.</p>
<h1 id="why-swiftui">Why SwiftUI</h1>
<p>SwiftUI is a modern UI framework designed to replace UIKit. Here are a few key reasons to move forward:</p>
<ul>
  <li>Declarative syntax that makes UI easier to reason about</li>
  <li>Smaller and cleaner codebase with better readability</li>
  <li>Growing support from Apple</li>
</ul>

<h1 id="migration-strategy-from-leaves-to-root">Migration Strategy: From Leaves to Root</h1>
<p><img src="/assets/img/posts/migrate_from_UIKit_to_SwiftUI/migration_path.png" alt="" /></p>

<p>Every app consists of features, each feature includes screens, and every screen has multiple subviews. That’s where the idea From Leaves to Root comes from.</p>
<ol>
  <li>Start with subview - these are the easiest to migrate and reuse.</li>
  <li>Then migrate individual screens that use these subviews.</li>
  <li>Once screens are ready, group them into features or user flows.</li>
  <li>Finally, migrate the main app structure and root navigation.</li>
</ol>

<p>This way, you reduce the risk and ensure that every level of the app is prepared before moving deeper.</p>
<h1 id="getting-started-with-the-design-system">Getting Started with the Design System</h1>
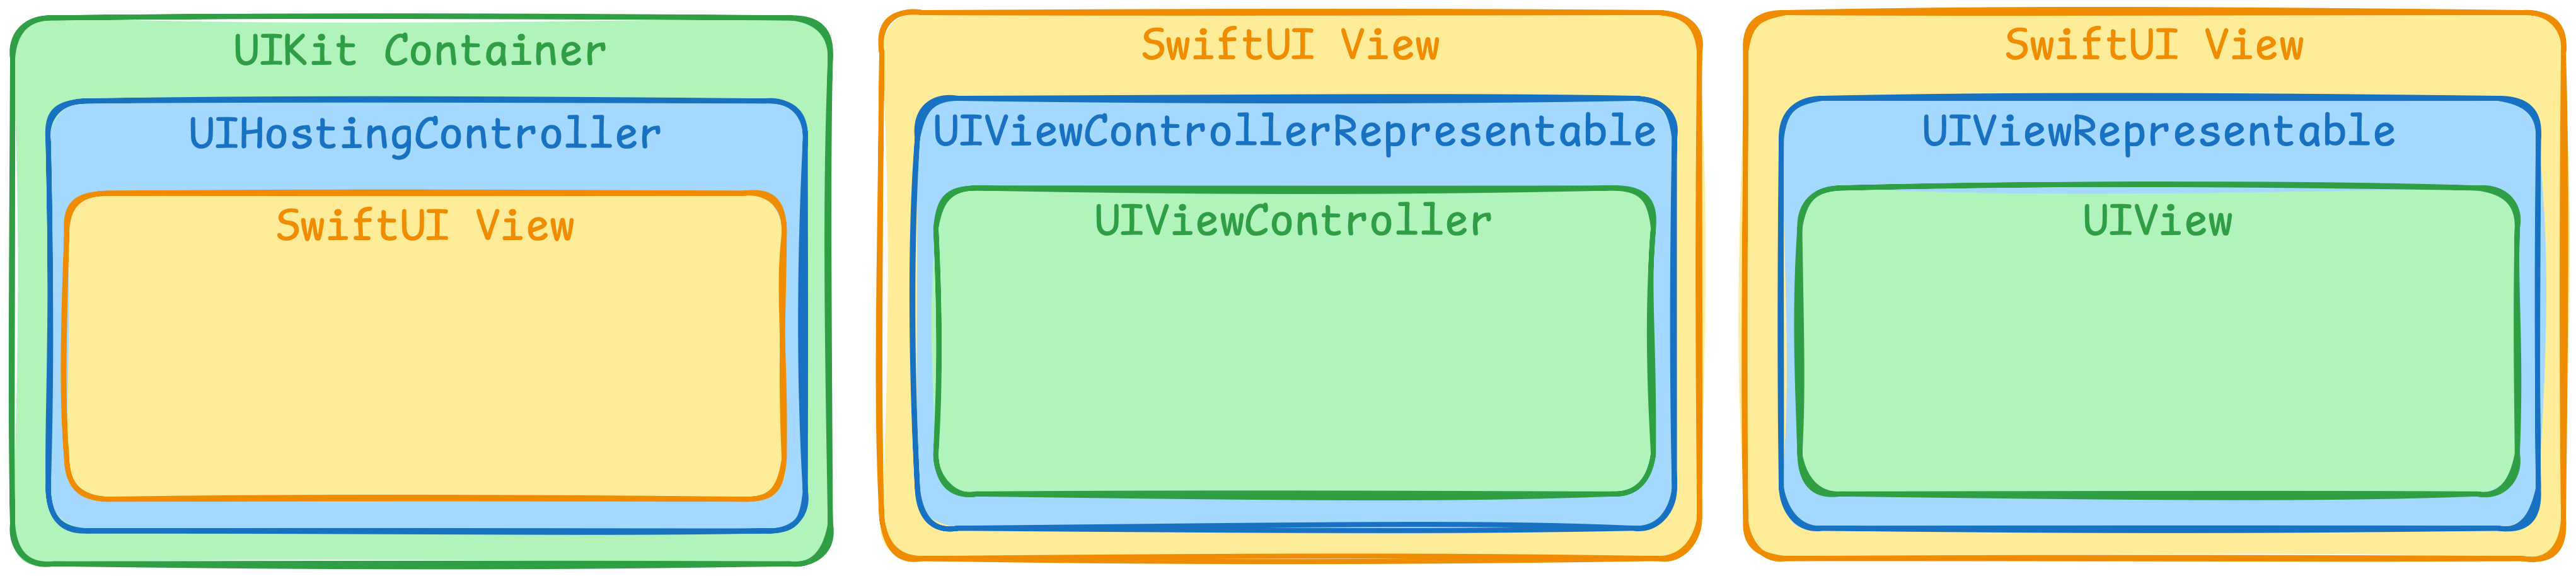
<p>The first and most important step is to migrate the design system. You need to create SwiftUI components that can be used both in SwiftUI and UIKit.
Two techniques help:</p>
<ul>
  <li>Use <a href="https://developer.apple.com/documentation/swiftui/uihostingcontroller">UIHostingController</a> to wrap SwiftUI views and use them inside UIKit.</li>
  <li>Use <a href="https://developer.apple.com/documentation/swiftui/uiviewrepresentable">UIViewRepresentable</a> or <a href="https://developer.apple.com/documentation/swiftui/uiviewcontrollerrepresentable">UIViewControllerRepresentable</a> to wrap UIKit components for SwiftUI.
<img src="/assets/img/posts/migrate_from_UIKit_to_SwiftUI/swiftui_uikit_wrappers.png" alt="" /></li>
</ul>

<p>This compatibility layer will allow you to slowly introduce SwiftUI components into the existing codebase.</p>

<h2 id="example-migrating-a-custom-button-from-uikit-to-swiftui">Example: Migrating a Custom Button from UIKit to SwiftUI</h2>
<p>Let’s say you have a custom button in your design system. Right now, it’s written with UIKit and used only in UIKit screens.
This is a great candidate for starting migration; it’s a reusable view, a classic “leaf” in the UI tree.</p>
<h3 id="step-1-create-a-shared-configuration">Step 1: Create a Shared Configuration</h3>
<p>First, define a shared configuration model. This struct will be used both by UIKit and SwiftUI.</p>
<div class="language-swift highlighter-rouge"><div class="highlight"><pre class="highlight"><code><span class="kd">struct</span> <span class="kt">CustomButtonConfiguration</span> <span class="p">{</span>
    <span class="k">let</span> <span class="nv">title</span><span class="p">:</span> <span class="kt">String</span>
    <span class="k">let</span> <span class="nv">action</span><span class="p">:</span> <span class="p">()</span> <span class="o">-&gt;</span> <span class="kt">Void</span>
<span class="p">}</span>
</code></pre></div></div>
<p>This way, you can keep the button logic and appearance consistent across platforms.</p>
<h3 id="step-2-build-the-swiftui-view">Step 2: Build the SwiftUI View</h3>
<p>Now let’s create a SwiftUI view that renders the button using this configuration.</p>
<div class="language-swift highlighter-rouge"><div class="highlight"><pre class="highlight"><code><span class="kd">struct</span> <span class="kt">CustomButton</span><span class="p">:</span> <span class="kt">View</span> <span class="p">{</span>
    <span class="k">let</span> <span class="nv">config</span><span class="p">:</span> <span class="kt">CustomButtonConfiguration</span>

    <span class="k">var</span> <span class="nv">body</span><span class="p">:</span> <span class="kd">some</span> <span class="kt">View</span> <span class="p">{</span>
        <span class="kt">Button</span><span class="p">(</span><span class="n">configuration</span><span class="o">.</span><span class="n">title</span><span class="p">,</span> <span class="nv">action</span><span class="p">:</span> <span class="n">config</span><span class="o">.</span><span class="n">action</span><span class="p">)</span>
    <span class="p">}</span>
<span class="p">}</span>
</code></pre></div></div>
<p>Now you can use this SwiftUI view in all new SwiftUI screens.</p>
<h3 id="step-3-make-it-available-in-uikit">Step 3: Make It Available in UIKit</h3>
<p>To use this SwiftUI button in UIKit, you can wrap it with <code class="language-plaintext highlighter-rouge">UIHostingController</code>.</p>
<div class="language-swift highlighter-rouge"><div class="highlight"><pre class="highlight"><code><span class="kd">class</span> <span class="kt">CustomButtonView</span><span class="p">:</span> <span class="kt">UIView</span> <span class="p">{</span>
    <span class="kd">private</span> <span class="k">let</span> <span class="nv">hostingController</span><span class="p">:</span> <span class="kt">UIHostingController</span><span class="o">&lt;</span><span class="kt">CustomButton</span><span class="o">&gt;</span>

    <span class="nf">init</span><span class="p">(</span><span class="nv">config</span><span class="p">:</span> <span class="kt">CustomButtonConfiguration</span><span class="p">)</span> <span class="p">{</span>
        <span class="k">let</span> <span class="nv">swiftUIButton</span> <span class="o">=</span> <span class="kt">CustomButton</span><span class="p">(</span><span class="nv">config</span><span class="p">:</span> <span class="n">config</span><span class="p">)</span>
        <span class="k">self</span><span class="o">.</span><span class="n">hostingController</span> <span class="o">=</span> <span class="kt">UIHostingController</span><span class="p">(</span><span class="nv">rootView</span><span class="p">:</span> <span class="n">swiftUIButton</span><span class="p">)</span>
        <span class="k">super</span><span class="o">.</span><span class="nf">init</span><span class="p">(</span><span class="nv">frame</span><span class="p">:</span> <span class="o">.</span><span class="n">zero</span><span class="p">)</span>

        <span class="nf">setup</span><span class="p">()</span>
    <span class="p">}</span>

    <span class="kd">required</span> <span class="nf">init</span><span class="p">?(</span><span class="nv">coder</span><span class="p">:</span> <span class="kt">NSCoder</span><span class="p">)</span> <span class="p">{</span>
        <span class="nf">fatalError</span><span class="p">(</span><span class="s">"init(coder:) has not been implemented"</span><span class="p">)</span>
    <span class="p">}</span>

    <span class="kd">private</span> <span class="kd">func</span> <span class="nf">setup</span><span class="p">()</span> <span class="p">{</span>
        <span class="k">let</span> <span class="nv">hostedView</span> <span class="o">=</span> <span class="n">hostingController</span><span class="o">.</span><span class="n">view</span><span class="o">!</span>
        <span class="n">hostedView</span><span class="o">.</span><span class="n">translatesAutoresizingMaskIntoConstraints</span> <span class="o">=</span> <span class="kc">false</span>
        <span class="nf">addSubview</span><span class="p">(</span><span class="n">hostedView</span><span class="p">)</span>

        <span class="kt">NSLayoutConstraint</span><span class="o">.</span><span class="nf">activate</span><span class="p">([</span>
            <span class="n">hostedView</span><span class="o">.</span><span class="n">topAnchor</span><span class="o">.</span><span class="nf">constraint</span><span class="p">(</span><span class="nv">equalTo</span><span class="p">:</span> <span class="n">topAnchor</span><span class="p">),</span>
            <span class="n">hostedView</span><span class="o">.</span><span class="n">bottomAnchor</span><span class="o">.</span><span class="nf">constraint</span><span class="p">(</span><span class="nv">equalTo</span><span class="p">:</span> <span class="n">bottomAnchor</span><span class="p">),</span>
            <span class="n">hostedView</span><span class="o">.</span><span class="n">leadingAnchor</span><span class="o">.</span><span class="nf">constraint</span><span class="p">(</span><span class="nv">equalTo</span><span class="p">:</span> <span class="n">leadingAnchor</span><span class="p">),</span>
            <span class="n">hostedView</span><span class="o">.</span><span class="n">trailingAnchor</span><span class="o">.</span><span class="nf">constraint</span><span class="p">(</span><span class="nv">equalTo</span><span class="p">:</span> <span class="n">trailingAnchor</span><span class="p">)</span>
        <span class="p">])</span>
    <span class="p">}</span>
<span class="p">}</span>
</code></pre></div></div>
<p>This class allows you to use the new SwiftUI button in any UIKit screen by simply passing the same shared configuration.</p>

<h3 id="summary">Summary</h3>
<p>With this pattern:</p>
<ul>
  <li>SwiftUI screens use <code class="language-plaintext highlighter-rouge">CustomButton</code> directly</li>
  <li>UIKit screens use <code class="language-plaintext highlighter-rouge">CustomButtonView</code></li>
  <li>Both share the same <code class="language-plaintext highlighter-rouge">CustomButtonConfiguration</code></li>
</ul>

<p>This is a clean and practical example of <em>migrating a leaf</em>, and it keeps your design system consistent across your codebase.</p>
<h1 id="gradual-replacement-of-screens">Gradual Replacement of Screens</h1>
<p>Start with low-risk screens, such as:</p>
<ul>
  <li>Settings</li>
  <li>About pages</li>
  <li>Simple informational views</li>
</ul>

<p>Once these are stable, continue with more important flows. Leave your core flows for the final stage, after the team has gained confidence.
During the process, rely on bridges between UIKit and SwiftUI. You don’t need to migrate everything at once. Use what works best in each case.</p>
<h1 id="managing-the-migration-inside-the-team">Managing the Migration Inside the Team</h1>
<p>Large migrations are never just about code. They are also about team culture, support, and documentation.
Here’s what helps:</p>
<ul>
  <li>Create a dedicated Slack channel for SwiftUI questions</li>
  <li>Schedule office hours with SwiftUI experts</li>
  <li>Run workshops and record sessions</li>
  <li>Build tutorials on lifecycle, previews, and state management</li>
  <li>Define a SwiftUI style guide</li>
  <li>Set up pre-commit hooks to enforce coding standards</li>
  <li>Offer onboarding tools: code snippets, screen templates, reusable components</li>
  <li>Run regular review sessions to share the migration experience</li>
  <li>Require approval for using SwiftUI in new features, with clear documentation</li>
  <li>Create a SwiftUI Adoption Team to review implementation quality</li>
  <li>Use a separate <code class="language-plaintext highlighter-rouge">GitHub</code> label for SwiftUI pull requests</li>
</ul>

<p>These steps help create a supportive environment and improve the quality of SwiftUI code across the company.</p>
<h1 id="automated-testing-with-swiftui">Automated Testing with SwiftUI</h1>
<p>The good news: you don’t need to rewrite all your tests.
Because SwiftUI supports accessibility identifiers just like UIKit, you can reuse your existing UI tests. This reduces regression risks and gives confidence that your migration didn’t break the user experience.</p>
<div class="language-swift highlighter-rouge"><div class="highlight"><pre class="highlight"><code><span class="kt">Button</span><span class="p">(</span><span class="s">"Login"</span><span class="p">)</span> <span class="p">{</span>
  <span class="c1">// action</span>
<span class="p">}</span>
<span class="o">.</span><span class="nf">accessibilityIdentifier</span><span class="p">(</span><span class="s">"login_button"</span><span class="p">)</span>

<span class="k">let</span> <span class="nv">button</span> <span class="o">=</span> <span class="n">app</span><span class="o">.</span><span class="n">buttons</span><span class="p">[</span><span class="s">"login_button"</span><span class="p">]</span>
<span class="kt">XCTAssert</span><span class="p">(</span><span class="n">button</span><span class="o">.</span><span class="n">exists</span><span class="p">)</span>
</code></pre></div></div>
<p>Use the same identifiers for buttons, labels, and inputs. The test scripts will continue to work even after the screens are fully rewritten in SwiftUI.</p>
<h3 id="preview-reliability">Preview Reliability</h3>
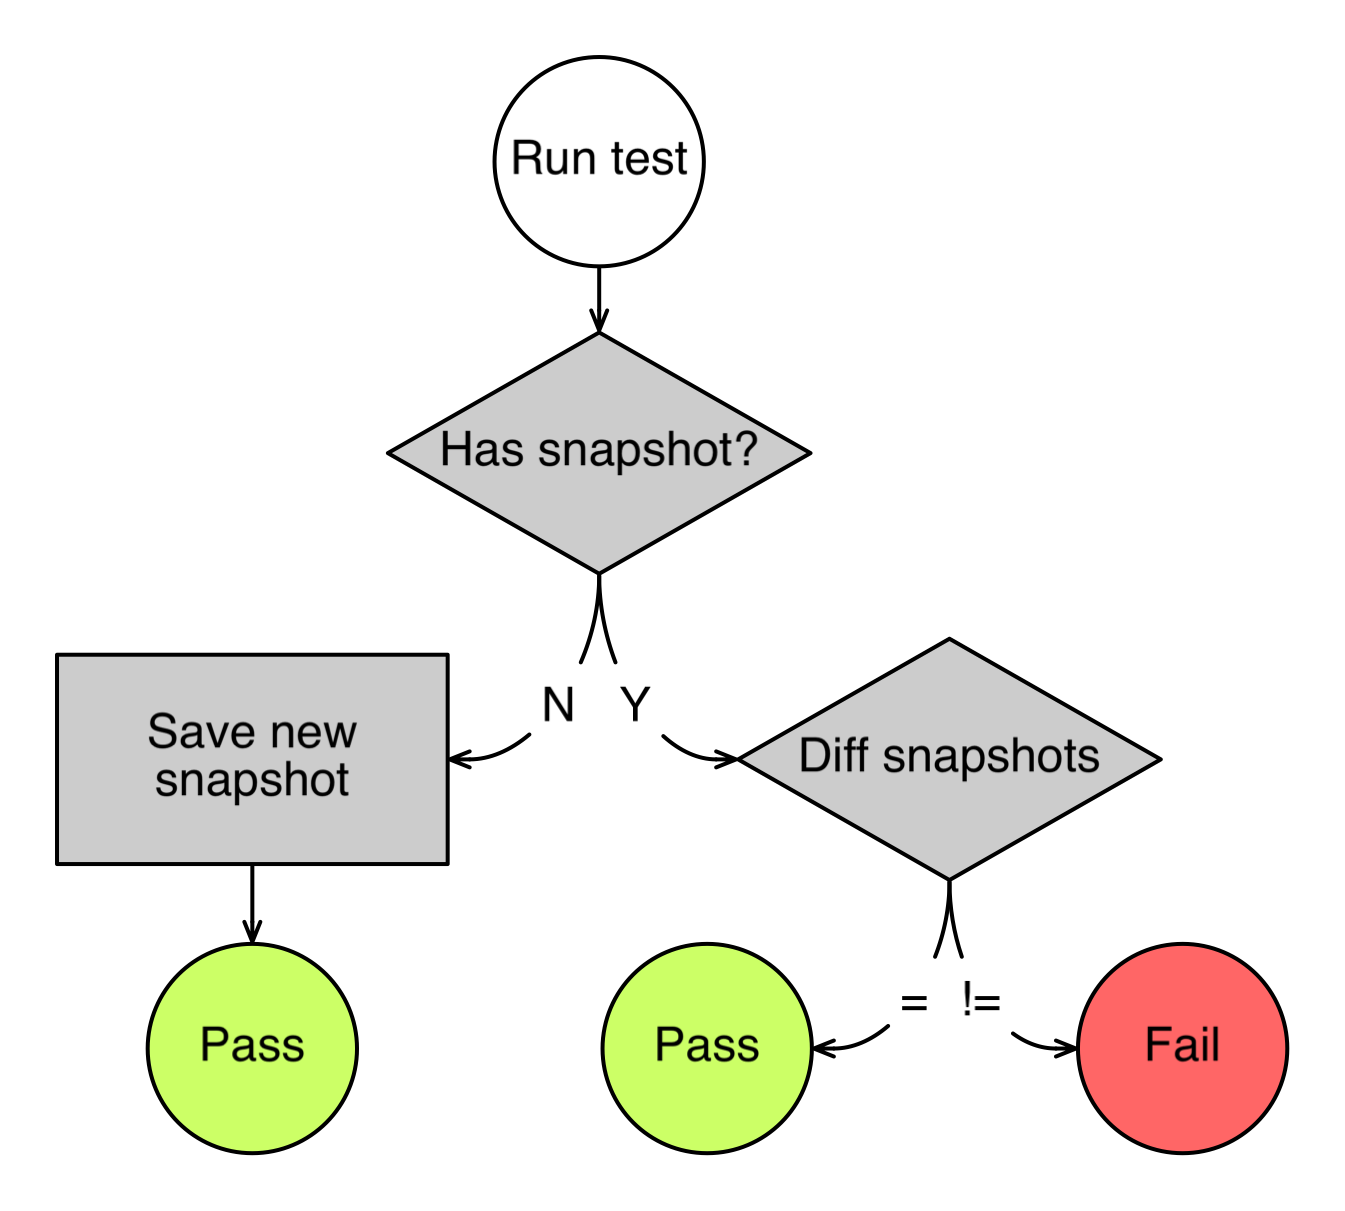
<p>SwiftUI previews are helpful but not always reliable. They can break, crash, or show outdated results.
To improve trust in your previews:</p>
<ul>
  <li>Add snapshot tests to track changes</li>
  <li>Use snapshots to detect unwanted UI modifications</li>
  <li>Treat snapshots as a safety net for design consistency
<img src="/assets/img/posts/migrate_from_UIKit_to_SwiftUI/url.png" alt="" /></li>
</ul>

<p>This approach will help you maintain accurate previews and avoid last-minute surprises in production.</p>
<h1 id="conclusion">Conclusion</h1>
<p>Migrating to SwiftUI is a big step, but with the right strategy, it becomes manageable. Start with subviews, build your foundation, and move step-by-step toward the full transition.</p>

<p>Try creating your first SwiftUI component and wrapping it with <code class="language-plaintext highlighter-rouge">UIHostingController</code>. Migrate a simple screen. Build confidence, and let the team grow together with the framework.</p>]]></content><author><name>Vlad Khambir</name><email>vlad.khambir@gmail.com</email></author><category term="iOS Development" /><category term="Architecture" /><category term="SwiftUI" /><category term="UIKit" /><summary type="html"><![CDATA[A practical guide to moving your existing UIKit codebase towards SwiftUI, step by step, using the "From Leaves to Root" strategy.]]></summary></entry><entry><title type="html">The Most Valuable WWDC 2025 Sessions for iOS Engineers</title><link href="https://www.vladkhambir.com/posts/wwdc-2025/" rel="alternate" type="text/html" title="The Most Valuable WWDC 2025 Sessions for iOS Engineers" /><published>2025-06-10T15:00:00-04:00</published><updated>2025-06-10T15:00:00-04:00</updated><id>https://www.vladkhambir.com/posts/wwdc-2025</id><content type="html" xml:base="https://www.vladkhambir.com/posts/wwdc-2025/"><![CDATA[<p>Every year, I carefully watch WWDC sessions to find the ones that are the most useful in my daily work as an iOS engineer. My main goal is to select videos that bring real value to real projects-features I can apply right away. I focus on topics like localization, in-app purchases, testing improvements, and new capabilities available to users with the latest OS versions. SwiftUI is my top priority, so I always look for updates in this area first, as it’s the modern way to build iOS apps and preferred over UIKit for new development.</p>

<p>If you’re trying to stay up to date with the most important announcements without watching dozens of sessions, this curated list is for you. These 10 videos cover the most impactful updates from WWDC 2025-things you’ll actually use in production. I highly recommend watching them to get the most out of your time and bring immediate improvements to your apps.</p>

<h1 id="platforms-state-of-the-union-2025"><a href="https://developer.apple.com/videos/play/wwdc2025/102/">Platforms State of the Union 2025</a></h1>

<p>This is your yearly overview of everything new across Apple platforms. It covers enhancements in iOS, macOS, visionOS, Swift, SwiftUI, Xcode, and system frameworks. If you only watch one session this year, make it this one-it sets the stage for all the other updates.</p>

<h1 id="whats-new-in-xcode"><a href="https://developer.apple.com/videos/play/wwdc2025/247/">What’s New in Xcode</a></h1>

<p>This session highlights new features in Xcode 16, including improvements in code navigation, debugging, Swift Testing, and performance tooling. If you want to be more productive and write better code, don’t skip this one.</p>

<h1 id="whats-new-in-swift"><a href="https://developer.apple.com/videos/play/wwdc2025/245/">What’s New in Swift</a></h1>

<p>Explore the latest changes in the Swift language, including macros, ownership features, and compiler enhancements. This session is great if you’re passionate about writing more expressive, safe, and efficient Swift code.</p>

<h1 id="whats-new-in-swiftui"><a href="https://developer.apple.com/videos/play/wwdc2025/256/">What’s New in SwiftUI</a></h1>

<p>The SwiftUI team shares new APIs and design improvements for building better UIs across all Apple platforms. This session includes layout updates, animation enhancements, and new view modifiers that will simplify your UI development workflow. A must-watch if SwiftUI is your primary framework.</p>

<h1 id="optimize-swiftui-performance-with-instruments"><a href="https://developer.apple.com/videos/play/wwdc2025/306/">Optimize SwiftUI Performance with Instruments</a></h1>

<p>Learn how to use the latest Instruments features to find and fix performance issues in SwiftUI apps. This video walks through practical scenarios and demonstrates how to detect slow views, measure rendering cost, and optimize navigation. A must for shipping smooth, fast user interfaces.</p>

<h1 id="meet-the-foundation-models-framework"><a href="https://developer.apple.com/videos/play/wwdc2025/286/">Meet the Foundation Models Framework</a></h1>

<p>A high-level introduction to Apple’s new on-device LLM API. Learn about guided generation, streaming, tool calling, and stateful sessions in Swift. If you’re planning to integrate AI features in your apps while keeping data private, this is your entry point.</p>

<h1 id="create-icons-with-icon-composer"><a href="https://developer.apple.com/videos/play/wwdc2025/361/">Create Icons with Icon Composer</a></h1>

<p>Apple introduces Icon Composer, a new tool to generate all necessary app icon assets from a single SVG. This tool saves time and ensures pixel-perfect results across platforms. It’s ideal for developers and designers who want to streamline the app icon workflow.</p>

<h1 id="record-replay-and-review-ui-automation-with-xcode"><a href="https://developer.apple.com/videos/play/wwdc2025/344/">Record, Replay, and Review: UI Automation with Xcode</a></h1>

<p>Discover how to record UI interactions, replay them across devices, and analyze them in Xcode. This new UI testing flow simplifies test creation and debugging. If you care about test coverage and regression safety, this session is worth your time.</p>

<h1 id="whats-new-in-storekit-and-in-app-purchase"><a href="https://developer.apple.com/videos/play/wwdc2025/241/">What’s New in StoreKit and In-App Purchase</a></h1>

<p>This session introduces updates to StoreKit 2: expanded offer support, SwiftUI views for subscriptions, and simpler verification using App Store Server Library. If your app includes subscriptions or IAPs, this session helps you boost monetization with less code.</p>

<h1 id="code-along-explore-localization-with-xcode"><a href="https://developer.apple.com/videos/play/wwdc2025/225/">Code-Along: Explore Localization with Xcode</a></h1>

<p>A hands-on walkthrough of localization in Xcode using String Catalogs, plural rules, language exports, and auto-generated comments. If you support multiple languages or plan to, this will save you hours and help translators do a better job.</p>

<h1 id="conclusion">Conclusion</h1>

<p>WWDC is the best time of the year for every iOS engineer to learn, get inspired, and bring new ideas to their apps. If you don’t have time to watch everything, I hope this list helped you prioritize the most impactful sessions.</p>

<p>But I strongly recommend opening the <a href="https://developer.apple.com/videos/wwdc2025/">full list of WWDC 2025 videos</a> and checking out sessions that match your domain. If you’re working with games, visionOS, watchOS, accessibility, or anything beyond iOS, there’s a lot more value waiting for you. Explore and build something great!</p>]]></content><author><name>Vlad Khambir</name><email>vlad.khambir@gmail.com</email></author><category term="iOS Development" /><category term="WWDC" /><category term="WWDC" /><category term="iOS" /><summary type="html"><![CDATA[My curated list of 10 WWDC 2025 sessions that bring real value to real production projects, things you'll actually use.]]></summary></entry><entry><title type="html">Enhancing Mobile App Quality. The Importance of Testing.</title><link href="https://www.vladkhambir.com/posts/tests-in-mobile-development/" rel="alternate" type="text/html" title="Enhancing Mobile App Quality. The Importance of Testing." /><published>2023-06-17T15:00:00-04:00</published><updated>2023-06-17T15:00:00-04:00</updated><id>https://www.vladkhambir.com/posts/tests-in-mobile-development</id><content type="html" xml:base="https://www.vladkhambir.com/posts/tests-in-mobile-development/"><![CDATA[<p>Testing plays a vital role in ensuring the quality and reliability of mobile apps. By thoroughly testing the software during the development process, mobile software developers can identify and address issues early, leading to a more stable and user-friendly application.</p>

<p>In this article, we will explore the results of a survey conducted among mobile software developers. We will delve into the reasons for writing tests and an overview of different test types.</p>

<h1 id="-survey-results">📊 Survey Results</h1>
<p>I conducted a survey of over 50 mobile developers to learn about their testing practices in their projects.</p>

<p><img src="/assets/img/posts/tests_in_mob_dev/survey_results_do_you_write_tests.png" alt="Do you write tests" />
The results showed that 55% of the surveyed developers do not write tests, while the other 45% believed it is important.</p>

<p>When asked why they do not write tests, the main reasons cited were:</p>
<ul>
  <li>⏰ Lack of sufficient time to dedicate to writing and maintaining tests.</li>
  <li>👎 The perception that their current codebase is unsuitable for effective testing.</li>
  <li>🔃 Frequent code changes that make maintaining tests challenging.</li>
  <li>❌ Limited proficiency in writing comprehensive tests.</li>
  <li>🤖 Overreliance on end-to-end testing as a substitute for more granular testing practices.</li>
</ul>

<p><img src="/assets/img/posts/tests_in_mob_dev/survey_results_test_coverage.png" alt="Code coverage" />
The second question in the survey focused on code coverage, revealing that a significant number of developers had low code coverage, with only a few achieving coverage above 80%. In fact, the majority of respondents had a code coverage level of merely 10%.</p>

<p>To further explore this aspect, I posed additional questions to developers with less than 10% code coverage and those with more than 80% code coverage.
For developers with less than 10% coverage, I asked: What areas do you cover in testing? Their responses shed light on the following:</p>
<ol>
  <li><strong>Critical functionality</strong>: These developers prioritize testing critical functionalities of the app, such as onboarding processes and payment systems. These components are crucial for ensuring a seamless user experience and require thorough validation.</li>
  <li><strong>Difficult logic</strong>: Testing efforts extend to challenging and complex logic areas of the codebase, including parsers, calculations, algorithms, and other intricate components that significantly contribute to the app’s functionality.</li>
  <li><strong>Business logic</strong>: Developers also focus on testing the business logic of the app, encompassing view models and use cases. These components represent the core functionalities and workflows of the application.</li>
</ol>

<p>Conversely, developers with more than 80% code coverage were asked about the areas they do not cover. Their responses included the following:</p>
<ol>
  <li><a href="https://www.vladkhambir.com/posts/humble-object/">Humble Objects</a>: These developers mentioned that they do not write tests specifically for Humble Objects, which are minimalistic and decoupled classes popularized by Uncle Bob (Robert C. Martin) in his book. Humble Objects handle low-level details and interactions and are isolated from the complexities of the system.</li>
  <li>A/B tests: Another area not covered by these developers is A/B tests. Due to the potential for frequent changes, they opt not to write tests for this functionality, as it may undergo modifications in the near future.</li>
</ol>

<p>Based on these two answers, we can determine which areas to prioritize for test coverage in the absence of tests in our app and establish criteria for when to conclude our testing efforts.</p>

<h1 id="-reasons-to-write-tests">🤔 Reasons to Write Tests</h1>
<p><img src="/assets/img/posts/tests_in_mob_dev/reasons_road.png" alt="Reasons road" />
Just like road markings guide drivers and enhance safety, tests provide several benefits in software development. Let’s explore the parallels between road markings and testing, highlighting their shared pros.</p>
<ol>
  <li>Increased Safety and Reduced Chances of Crashes: Road markings serve as visual cues that guide drivers, enhancing road safety and reducing the likelihood of accidents. Similarly, testing in software development minimizes the chances of errors or bugs, ensuring a stable and secure product. By thoroughly testing software, developers can identify and rectify potential issues, leading to a more robust and reliable application.</li>
  <li>Easy Adaptation for Drivers in New Roads: Road markings provide valuable information to drivers, especially when navigating unfamiliar roads. They offer clear guidance and help drivers adapt quickly to new surroundings. In a similar vein, tests in software development contribute to the smooth onboarding process for new team members. Well-written tests serve as documentation and examples, allowing new developers to understand the existing codebase more efficiently and make necessary modifications confidently.</li>
  <li>Limitations that Help Drivers Ride Without Stress: Road markings set boundaries and provide clear instructions, helping drivers navigate complex situations and reduce stress on the road. Similarly, testing imposes limitations on the code-writing process, promoting better coding practices and improved code quality. Tests serve as checks and balances, ensuring that developers adhere to coding standards, maintain consistency, and produce reliable software.</li>
</ol>

<p>In summary, testing shares key advantages with road markings. It reduces the chances of errors, facilitates the onboarding process for new team members, and establishes limitations that improve code quality. By embracing testing practices, software developers can mitigate risks, enhance productivity, and deliver robust and reliable applications, just as road markings contribute to safer and more efficient roadways.</p>

<h3 id="other-benefits-of-tests">Other Benefits of Tests:</h3>
<p>Writing tests brings several benefits to mobile software development:</p>
<ul>
  <li>🏎️ <strong>Development speed</strong>: Tests catch errors early, allowing developers to fix problems promptly and maintain a faster development pace.</li>
  <li>✅ <strong>Safe refactoring</strong>: Tests act as a safety net during code refactoring, ensuring that changes do not introduce regressions or unintended consequences.</li>
  <li>🐞 <strong>Early detection of bugs</strong>: Tests help identify issues and unexpected behavior early in the development cycle, enabling developers to address them promptly and reduce debugging efforts later on.</li>
  <li>📈 <strong>Better code quality</strong>: Writing tests encourages cleaner and more maintainable code, leading to improved overall code quality.</li>
  <li>🙌 <strong>Reduced manual testing</strong>: Automated tests eliminate the need for extensive manual testing, saving time and effort while maintaining consistent and reliable results.</li>
</ul>

<h1 id="️-test-types-overview">🎛️ Test Types Overview</h1>
<p>Testing in software development can be categorized into three types, represented by a pyramid
<img src="/assets/img/posts/tests_in_mob_dev/test_types_pyramid.png" alt="Test types pyramid" /></p>
<ol>
  <li><strong>Unit Testing</strong>: Unit testing, comparable to testing individual components of a rocket like the fuel tank or combustion chamber, focuses on testing isolated units of code. It verifies that each unit performs correctly in isolation, catching bugs early on. Unit testing is efficient and cost-effective.</li>
  <li><strong>Integration Testing</strong>: Similar to verifying the interaction between the fuel tank and combustion chamber, integration testing ensures that different components work together properly. It validates the communication and collaboration between units that have passed their individual tests.</li>
  <li><strong>End-to-End Testing</strong>: End-to-end testing, analogous to launching a rocket to observe its behavior throughout the entire process, validates the entire system as a whole. It simulates real-life scenarios, including user interactions, and ensures seamless functionality across all components. End-to-end testing represents the highest level of testing and is comprehensive but can be more expensive to maintain.</li>
</ol>

<p>In summary, unit testing focuses on testing isolated units, integration testing verifies component interactions, and end-to-end testing validates the system as a whole, mirroring the stages of a rocket’s development and launch process.
While the traditional testing pyramid emphasizes a larger base of unit tests and fewer end-to-end tests, some teams prioritize end-to-end testing more prominently. This approach, known as the inverted pyramid, ensures thorough validation of features before releasing them to end users.
<img src="/assets/img/posts/tests_in_mob_dev/test_types_inverted_pyramid.png" alt="Test types inverted pyramid" />
In my team, we prefer this type of pyramid. However, it is worth noting that the majority of mobile development teams typically adhere to the standard testing pyramid.
<img src="/assets/img/posts/tests_in_mob_dev/survey_results_test_type.png" alt="Survey results test type" /></p>

<h1 id="-bonus-tools-that-we-use-in-our-team">🎁 Bonus: Tools that we use in our team</h1>
<p>It is essential to leverage the right tools to streamline and optimize the testing process. Here are a few tools which used by our team:</p>
<ol>
  <li>Code Generation: Code generation tools, such as <a href="https://github.com/krzysztofzablocki/Sourcery">Sourcery</a>, automate the creation of fake data and mocks, making the testing process more efficient and reducing manual effort.</li>
  <li>Snapshot Testing: Snapshot testing tools like <a href="https://github.com/pointfreeco/swift-snapshot-testing">Swift Snapshot Testing</a> enable developers to capture screenshots of the user interface and compare them to previously saved snapshots. This technique helps identify unintended changes and ensures visual consistency across different app versions.</li>
  <li><a href="https://appium.io/docs/en/2.0/">Appium</a>: Appium is an end-to-end testing tool that simulates user activities and verifies system behavior from a user’s perspective. It utilizes Espresso or UIAutomator2 for Android apps and XCUI for iOS apps. With a black box testing approach, Appium evaluates all relevant subsystems, including UI/UX, server, database, and dependencies.</li>
  <li>CI/CD Tools: <a href="https://fastlane.tools/">Fastlane</a>, <a href="https://danger.systems/">Danger</a>, and <a href="https://github.com/fastlane-community/xcov">Xcov</a> automate various tasks related to building, testing, and deploying mobile apps. Fastlane enables script execution, Danger integrates with the code review process for analysis, and Xcov assesses code coverage using changes from pull requests.</li>
</ol>

<p>By incorporating these tools into your testing process, you can improve efficiency, code quality, and overall app reliability.</p>

<h1 id="-conclusion">🎬 Conclusion</h1>
<p>In the fast-paced world of mobile app development, testing holds the key to success. It provides confidence in app quality and stability, ensuring a seamless user experience. The survey results highlighted the importance of test-driven development and the challenges faced by mobile software developers. By incorporating different types of tests, such as unit testing, integration testing, and end-to-end testing, developers can enhance the reliability, maintainability, and overall quality of their mobile apps.</p>

<p>Testing is not a burden but an investment in creating successful mobile apps that stand out in the competitive market. By prioritizing testing and utilizing the right tools, you can deliver mobile apps that meet user expectations and drive business success.</p>]]></content><author><name>Vlad Khambir</name><email>vlad.khambir@gmail.com</email></author><category term="Tests" /><category term="Survey" /><category term="Testing" /><category term="iOS" /><summary type="html"><![CDATA[Survey results from 50+ mobile developers on testing practices, with an overview of test types and tools.]]></summary></entry><entry><title type="html">Meetings through the eyes of a programmer</title><link href="https://www.vladkhambir.com/posts/meetings/" rel="alternate" type="text/html" title="Meetings through the eyes of a programmer" /><published>2022-04-29T16:00:00-04:00</published><updated>2022-04-29T16:00:00-04:00</updated><id>https://www.vladkhambir.com/posts/meetings</id><content type="html" xml:base="https://www.vladkhambir.com/posts/meetings/"><![CDATA[<p>My colleague and I had an assignment - to set up processes for our small team (10 members). At first look, it can be strange that developers set up processes. Why not a scrum master or a project manager?
Let’s go back in history and remember a little about the <a href="https://ru.wikipedia.org/wiki/Agile_Manifesto">Agile Manifesto</a> and its 17 authors, among whom are world-renowned software developers such as <a href="https://ru.wikipedia.org/wiki/%D0%9C%D0%B0%D1%80%D1%82%D0%B8%D0%BD,_%D0%A0%D0%BE%D0%B1%D0%B5%D1%80%D1%82_(%D0%B8%D0%BD%D0%B6%D0%B5%D0%BD%D0%B5%D1%80)">Robert Martin</a>, <a href="https://ru.wikipedia.org/wiki/%D0%A1%D0%B0%D0%B7%D0%B5%D1%80%D0%BB%D0%B5%D0%BD%D0%B4,_%D0%94%D0%B6%D0%B5%D1%84%D1%84">Jeff Sutherland</a>, <a href="https://ru.wikipedia.org/wiki/%D0%91%D0%B5%D0%BA,_%D0%9A%D0%B5%D0%BD%D1%82">Kent Beck</a>, <a href="https://ru.wikipedia.org/wiki/%D0%A4%D0%B0%D1%83%D0%BB%D0%B5%D1%80,_%D0%9C%D0%B0%D1%80%D1%82%D0%B8%D0%BD">Martin Fowler</a>, and others.</p>

<p>Inspired by this history, we set out to build our flexible project management framework 💪</p>

<p>One of the principles of Agile development states:</p>

<p>“The most efficient and effective method of conveying information to and within a development team is face-to-face conversation.”</p>

<p>This article is about communication, specifically the meetings we decided to hold with our team. We will discuss the necessary meetings, and reasons why we need them and consider participants and optimal meeting durations. 
Buckle up, we’re heading into the world of meetings, where time should fly by, to the moon 🚀</p>

<h2 id="-planning">📋 Planning</h2>
<p>Planning is the meeting that initiates the Sprint. At this meeting, we plan the work for the next Sprint.</p>

<h3 id="purposes">Purposes:</h3>
<ul>
  <li>The Product Owner and the team propose ways to increase the value of the product.</li>
  <li>Based on the proposals, the Sprint goal is formed.</li>
  <li>The team estimates the tasks that will help achieve the Sprint goal.</li>
  <li>The estimated tasks are moved from the backlog to the Sprint.</li>
</ul>

<h3 id="participants">Participants:</h3>
<p>The Scrum team and the Product Owner.</p>

<h3 id="timebox">Timebox:</h3>
<p><strong>Up to</strong> 1 hour.</p>

<h2 id="-refinement">🧐 Refinement</h2>
<p>Refinement is an activity that is carried out during the Sprint to prepare the backlog for the next Sprint planning and clarify details for current tasks. Refinement should be done regularly and, if necessary, throughout the entire Sprint, allocating time for this activity during planning.</p>

<h3 id="participants-1">Participants:</h3>
<p>The Scrum team and anyone who would like to know all details about the task.</p>

<h3 id="timebox-1">Timebox:</h3>
<p><strong>Up to</strong> 1 hour.</p>

<h2 id="-retrospective">🧠 Retrospective</h2>
<p><del>Retrospective - one more meeting in the calendar with an unclear agenda</del>
Retrospective - is a time at the end of a sprint that the team has for self-analysis.</p>

<h3 id="participants-2">Participants</h3>
<p>The Scrum team and product owner.</p>

<h3 id="timebox-2">Timebox</h3>
<p>Each team determines the time needed for the retrospective.
*Recommendation: 1 hour for a two-week sprint and 6 members team.</p>

<h3 id="purposes-1">Purposes:</h3>
<ul>
  <li>Brainstorming to generate new practices, ideas, and experiments that will help improve work;</li>
  <li>Discussing the results of experiments, confirming or rejecting new practices;</li>
  <li><del>Write down in a table what we have done well, what we have done poorly, and how we can fix it.</del>Sharing observations about the past sprint, identifying “weak points”. Each point should push the team towards actions that could improve their effectiveness.</li>
</ul>

<blockquote>
  <p>Example observation: “In the last sprint, we added a task that was not related to the sprint goal. To avoid delaying the release, we had to rush the testing. Let’s discuss this case and create new rules to avoid situations like that one. We will test our new practice in the next sprint.”</p>
</blockquote>

<h2 id="️-sync-up">♻️ Sync-up</h2>
<p>Sync-up is a regular meeting where a team discusses the current status and what needs to be done to move toward the sprint goal.</p>

<blockquote>
  <p>⚠️ If any questions require detailed consideration or answers during the meeting, an additional meeting is scheduled <strong>only</strong> for the interested parties.</p>
</blockquote>

<h3 id="participants-3">Participants</h3>
<p>The Scrum team.</p>

<h3 id="timebox-3">Timebox</h3>
<p><strong>Up to</strong> 15 minutes.</p>

<p>The frequency of sync-up meetings is determined by the Scrum team themselves. For example, it could be a daily or weekly sync.</p>

<h2 id="-pitch">💡 Pitch</h2>
<p>A pitch is a meeting where the organizer presents their idea for product improvement to interested parties.</p>

<h3 id="participants-4">Participants</h3>
<p>To be determined by the organizer.</p>

<h3 id="timebox-4">Timebox</h3>
<p><strong>Up to</strong> 30 minutes.</p>

<h1 id="where-to-go-next-">Where to go next? 🛣</h1>
<p>In my opinion, each team should have its own rules of the game, but it is always helpful to see how processes are organized in other teams. I hope you have learned something new for yourself, and on the next retrospective, you will share our experience with your team 🙌</p>]]></content><author><name>Vlad Khambir</name><email>vlad.khambir@gmail.com</email></author><category term="Productivity" /><category term="Agile" /><category term="Productivity" /><summary type="html"><![CDATA[How we set up meetings for our team: Planning, Refinement, Retrospective, Sync-up, and Pitch, with timebox recommendations.]]></summary></entry><entry><title type="html">Top 5 Programs for Productive Developers</title><link href="https://www.vladkhambir.com/posts/top-5-programs-for-dev-productivity/" rel="alternate" type="text/html" title="Top 5 Programs for Productive Developers" /><published>2022-03-25T15:00:00-04:00</published><updated>2022-03-25T15:00:00-04:00</updated><id>https://www.vladkhambir.com/posts/top-5-programs-for-dev-productivity</id><content type="html" xml:base="https://www.vladkhambir.com/posts/top-5-programs-for-dev-productivity/"><![CDATA[<p>Each of us uses various software daily to perform our work efficiently and effectively. I have prepared my top programs that I use every day, and I would be glad if you find something new and useful for yourself. Enjoy 😉</p>

<h2 id="alfred"><a href="https://www.alfredapp.com">Alfred</a></h2>
<p>Undoubtedly, the first place in my top list is honored by Alfred. In short, Alfred is an application launcher. The paid version of this product offers new possibilities in the form of Workflows. 
A Workflow allows you to automate repetitive tasks and significantly increase productivity.
Here’s an example Workflow for quickly launching an Xcode project:
<img src="/assets/img/posts/top_5_programs_for_dev_productivity/programs_productivity_1.png" alt="Alfred" /></p>

<p>How to use it? Launch Alfred using a hotkey (it resembles Spotlight) and enter the keyword for launching the Workflow - xc followed by the name of the project you want to open. A single press of Enter, and your project is already launched 💥
<img src="/assets/img/posts/top_5_programs_for_dev_productivity/programs_productivity_2.png" alt="Alfred" /></p>

<h2 id="dash"><a href="https://kapeli.com/dash">Dash</a></h2>
<p>A professional and experienced developer often looks for answers to their questions in the official documentation for various products. Would you like to have all the necessary documentation in one place? Then you’re definitely looking for Dash 😉
<img src="/assets/img/posts/top_5_programs_for_dev_productivity/programs_productivity_3.png" alt="Dash" />
Dash is an API documentation browser. Dash provides access to documentation for over 200 APIs.
As a bonus, Dash integrates with Alfred ❤️
<img src="/assets/img/posts/top_5_programs_for_dev_productivity/programs_productivity_4.png" alt="Dash" /></p>

<h2 id="proxyman"><a href="https://proxyman.io/">Proxyman</a></h2>
<p>Proxyman is a native high-performance macOS application that allows developers to easily capture, inspect, and manipulate HTTP requests/responses. It is similar to Charles Proxy, but with a much more modern interface.
<img src="/assets/img/posts/top_5_programs_for_dev_productivity/programs_productivity_5.png" alt="Proxyman" /></p>

<p>Proxyman enables you to intercept requests, write scripts to process and substitute server responses. It has a built-in simple guide for setting up proxies for iOS/Android simulators and physical devices.
The program is regularly updated and enriched with numerous new features 💪</p>

<h2 id="rapid-api"><a href="https://paw.cloud">Rapid API</a></h2>
<p>Rapid API is an HTTP client that I use for testing and documenting APIs. This client has a convenient, native interface that allows you to build requests, verify server responses, and export APIs.
<img src="/assets/img/posts/top_5_programs_for_dev_productivity/programs_productivity_6.png" alt="Paw" /></p>

<p>It is an excellent alternative to Postman. Rapid API is much more convenient and significantly faster than its main competitor, and it supports code generation (which can be a major advantage for some).</p>
<blockquote>
  <p>Rapid API comes at a cost, but every Black Friday, the folks at Rapid API give away their product for free without any limitations through their Twitter account. </p>
</blockquote>

<h2 id="drafts"><a href="https://getdrafts.com">Drafts</a></h2>
<p>Drafts is a quick note-taking app, a super convenient editor, and cloud synchronization. The simplicity of this product is unparalleled, and that’s what attracted me to it. Whenever I need to jot something down, I open Drafts first.
P.S. The free version of the app is more than sufficient.</p>

<h1 id="whats-next-">What’s next? 🛣</h1>
<p>I have shared about the tools that can increase the efficiency of your work and solve work-related tasks. I would be glad if you share your list of favorite programs with me via <a href="https://www.linkedin.com/in/khambir/">LinkedIn</a> or <a href="https://twitter.com/VKhambir">Twitter</a>.
I would be happy to try them out and write the second part of this article with new tools 😉</p>]]></content><author><name>Vlad Khambir</name><email>vlad.khambir@gmail.com</email></author><category term="Productivity" /><category term="Tools" /><category term="Productivity" /><summary type="html"><![CDATA[The tools I actually use every day: Alfred, Dash, Proxyman, Rapid API, and Drafts.]]></summary></entry><entry><title type="html">5 reasons why you need a pet project</title><link href="https://www.vladkhambir.com/posts/pet-project-advantages/" rel="alternate" type="text/html" title="5 reasons why you need a pet project" /><published>2021-09-02T17:00:00-04:00</published><updated>2021-09-02T17:00:00-04:00</updated><id>https://www.vladkhambir.com/posts/pet-project-advantages</id><content type="html" xml:base="https://www.vladkhambir.com/posts/pet-project-advantages/"><![CDATA[<p>Pet-project is usually an individual project that you work on in your free time, care for, nurture, and grow like your own pet 🐶</p>

<p>I have only 800 words to convince you that pet projects are useful and fun.</p>

<p>Let’s get started 🚀</p>

<p>At the moment, I have two pet projects. <a href="https://apps.apple.com/ua/app/medkrok/id1515141600">One of them</a> I submitted to a competition organized by Highload. And you know what? I took first place 😳</p>

<p>The emotions that filled me after <a href="https://mc.today/my-sobrali-20-lichnyh-proektov-razrabotchikov-na-konkurs-uznajte-kto-pobedil-i-vyigral-iphone/">the announcement of the competition results</a> quickly prompted me to write this article and share with you the reasons why you need your pet project too.</p>

<h1 id="reason-1-pet-projects-offer-freedom">Reason №1: Pet projects offer freedom</h1>

<p>At work, you have a boss, a client, a team leader, and other stakeholders to answer to. But with a pet project, you’re in charge. You set the goals, define the tasks, and decide which technologies to use. This freedom can be liberating and allows you to explore your creative side.</p>

<p>With a pet project, you have complete control. You get to work on something that you’re passionate about, and you get to do it on your own terms.</p>

<blockquote>
  <p>Freedom in everything - this is how I would describe my pet projects.</p>
</blockquote>

<h1 id="reason-2-pet-projects-can-help-you-learn-and-grow">Reason №2: Pet projects can help you learn and grow</h1>

<p>The first advantage is freedom which allows you to use the latest technologies for your pet project. Yes, many things may still be in beta, but that won’t stop you 😉</p>

<p>Take and use the newest frameworks, and languages, experiment with architecture, and try what others are still afraid to try. This will give you unique knowledge, the ability to be on trend, and use new knowledge and skills for your main job. You can become an expert in technologies that will become mainstream in the future.</p>

<p>There are no limitations - use it for self-development and gaining unique experience that others cannot afford.</p>

<h1 id="reason-3-pet-projects-can-help-you-build-your-personal-brand">Reason №3: Pet projects can help you build your personal brand</h1>

<p>If you’re interested in building your personal brand, a pet project can be a great way to do it. By working on something you’re passionate about, you can demonstrate your skills and expertise to the world.</p>

<p>For example, you could create a GitHub repository for your pet project and share it with others. This can help you gain recognition in your field, and it can also help you build a network of like-minded individuals.</p>

<p>My pet project allowed me to take first place in the competition and give <a href="https://highload.today/studenty-sprashivali-kuda-skinut-dengi-chtoby-otblagodarit-kak-pet-proekt-prines-ukrainskomu-razrabotchiku-priznanie-i-popal-v-top-app-store/">my first interview</a>.</p>

<h1 id="reason-4-additional-income">Reason №4. Additional income.</h1>

<p>You can design a product that will be interesting not only to you from a technical point of view, but will also find its consumer. Naturally, users of your wonderful creation will happily support you financially if you offer something interesting in return.</p>

<p>I created an application that was in the top 10 in the Education section of the App Store. My product is completely free and without ads, but even that didn’t stop users from asking me where they could donate money 🤯</p>

<p>If you suddenly decide to create a project to make money, you will need knowledge about <a href="https://www.vladkhambir.com/posts/digital-marketing-for-engineers/">digital marketing</a>, which I have already written about on my blog 😉</p>

<h1 id="reason-5-your-portfolio-will-never-be-empty-again">Reason №5. Your portfolio will never be empty again.</h1>

<p>At work, you often need to sign a <a href="https://en.wikipedia.org/wiki/Non-disclosure_agreement">non-disclosure agreement (NDA)</a>. This agreement prohibits you from sharing details of implementation or even the fact that you worked on a particular project. You can work on something cool for a long time, but your portfolio will still be empty.</p>

<p>Guess what the solution is… 😏</p>

<p>That’s right - create your pet project, work on it in your free time, and add it to your portfolio. Sometimes, you can even share the source code and use it instead of completing a test task when getting hired.</p>

<h1 id="conclusion-">Conclusion 🔑</h1>

<p>It doesn’t matter whether your pet project is successful or not, you will gain unique experience, try something new, and raise the level of your professional skills, which will help advance your career.</p>

<h1 id="where-to-go-next-">Where to go next? 🛣</h1>

<p>Think about what you would like to learn. Perhaps you have long wanted to try something new. Maybe you have a unique idea? I think it’s time to bring your desires to life by creating your pet project 🙌</p>]]></content><author><name>Vlad Khambir</name><email>vlad.khambir@gmail.com</email></author><category term="IT-Проекты" /><category term="Career" /><summary type="html"><![CDATA[Freedom, learning, personal brand, additional income, portfolio: five reasons your side project is worth it.]]></summary></entry><entry><title type="html">Удаленка VS офис 🥊</title><link href="https://www.vladkhambir.com/posts/remote-vs-office/" rel="alternate" type="text/html" title="Удаленка VS офис 🥊" /><published>2021-07-10T15:00:00-04:00</published><updated>2021-07-10T15:00:00-04:00</updated><id>https://www.vladkhambir.com/posts/remote-vs-office</id><content type="html" xml:base="https://www.vladkhambir.com/posts/remote-vs-office/"><![CDATA[<p>Всем привет, меня зовут Влад и я интроверт.</p>

<p>Стоп-стоп, это не клуб анонимных интровертов, это поток мыслей интроверта о том почему работа в офисе может быть полезна даже для любителей работать в тишине, одиночестве и на домашнем диване.</p>

<h1 id="удалёнка--рай-">Удалёнка == рай 😇</h1>

<p>Я работал удаленно три года и да, дело было еще до того как это стало <del>мейнстримом</del> требованием во время пандемии.</p>

<p>Мне было супер комфортно, я мог работать на диване, на кухне, на потолке, под стулом, в ванной, одним словом - везде, где мне будет удобно.</p>

<p>Я четко разграничил время жизни и время работы, использовал time-треккеры, они помогали мне работать столько часов, сколько я запланировал, ни минутой больше или меньше. Такие рамки позволили мне быть максимально эффективным и оставить время, когда я чувствую себя дома как дома, а не как на работе.</p>

<p>Ах, да, время на дорогу в офис я обменял на дополнительный сон, а вот время на дорогу с офиса - на время с близкими и друзьями. Согласитесь, все же прекрасно. Идеальный work-life balance.</p>

<p>А что, если я скажу, что я немного ошибался? 😱</p>

<h1 id="удалёнка--рай--1">Удалёнка != рай 🤯</h1>

<p>Давайте быть честными, настроить себя на продуктивную работу дома может далеко не каждый, но мне это удалось спустя время. Как ветеран удаленной работы могу сказать, что первое время придется несладко :]</p>

<h3 id="проблема-1">Проблема 1</h3>

<p>Нужно понять для себя, что удаленная работа - это работа. И ее плюсы перекрываются <strong>жирными</strong> минусами. И первая проблема состоит в том, что поначалу будет сложно настроить себя на работу в месте, где есть телевизор, диван, Youtube, Netflix… Хорошая новость в том, что эта проблема зависит только от тебя и при желании ее легко можно побороть.</p>

<h3 id="проблема-2">Проблема 2</h3>

<p>Ты уже понял(-а), что удаленная работа - это работа и ее надо работать, но есть окружение, которое думает что если ты дома - ты не занят. Сюда относим самое дорогое, что у нас есть - семья. Вам круто повезет, если вы сможете донести своим близким важность и специфику удаленной работы. Я вот сумел, объяснил в какое время я недоступен, а в какое доступен, договорился о кодовом слове, которое означает “не трогайте меня, безумно занят” (слово “Банан” 🍌 максимально нейтральное и подошло мне и моей семье 😉).</p>

<blockquote>
  <p><strong>Ловушка</strong></p>

  <p>Если вдруг ты подумал(-а), что можешь дома организовать себе отдельное место для работы где вас никто не будет трогать - поздравляю, ты лишился одного из плюсов удалёнки - работать где угодно.</p>
</blockquote>

<h3 id="проблема-3">Проблема 3</h3>

<p>Готов поставить 1000 баксов на то, что твои коллеги из офиса уверены в том, что дома ты не работаешь или работаешь меньше. Не знаю как тебе, но мне это создавало моральный дискомфорт. И если я что-то не успевал сделать в офисе - давление на самого себя было гораздо меньше, чем если я не успевал сделать это работая дома. Чем чревато? Выгоранием. Потому что в попытке кому-то что-то доказать появляются переработки, стрессы и тд.</p>

<p>Как бороться? Придется поработать над своим мышлением и восприятием ситуации. Я решал это time-треккерами. Если я законно отработал свои часы - меня совесть грызть не может, я выполнил все, что от меня было возможно. А насчет мнения коллег - вы команда и спустя время они убедятся в том, что ты дома тот еще зверь 🦁</p>

<h3 id="проблема-4-">Проблема 4 🏁</h3>

<p>Скажу сразу - эту проблему решить нельзя, сидя на удалёнке. Суть в живом общении. Ой да, зачем интроверту общение? Ответ прост - для саморазвития, роста, связей. Все это повышает твою профессиональную значимость и плохая новость в том, что удаленная работа в какой-то момент станет для тебя потолком, который не позволит тебе двигаться дальше. Без живого общения ты не найдешь своего <a href="https://ru.wikipedia.org/wiki/Возняк,_Стив">Стива Возняка</a>, что бы запилить стартап, мало кто захочет взять в команду человека, которого никогда в глаза не видел. Сидя дома можно быть отличным рабочим, но если хочешь бОльшего - придется выйти с зоны комфорта.</p>

<h1 id="удалёнка--офис-️">Удалёнка == Офис ⚖️</h1>

<p>Могу смело сказать, что все плюсы удалёнки перекрываются ее минусами. Как же оказаться в плюсе? Я для себя выбрал идеальный вариант - гибридный режим. Работай удаленно и в офисе. Смена обстановки поможет не выгореть, получить дополнительное время для сна (вместо дороги на работу), семьи (вместо дороги с работы) и в то же время работая в офисе ты получишь все плюшки в виде связей, живых обсуждений идей и новых вызовов твоей команды. Секрет оказался прост - все дело в балансе 😉</p>

<h1 id="заключение-">Заключение 🔑</h1>

<p>Если хочешь работать в комфорте, ощущать свободу, меньше тратить времени на дорогу и в то же время развиваться, заводить полезные знакомства и не упускать карьерных возможностей - придется найти баланс между удалёнкой и работой в офисе.</p>

<h1 id="куда-дальше-">Куда дальше? 🛣</h1>

<p>Определи для себя идеальный баланс удалёнка/офис, распредели в какие дни ты хочешь работать дома, а какие в офисе и попробуй договориться об этом графике со своей командой 💪</p>]]></content><author><name>Vlad Khambir</name><email>vlad.khambir@gmail.com</email></author><category term="Soft-skills" /><category term="Career" /><category term="Work-Life" /><summary type="html"><![CDATA[Мысли интроверта о плюсах и минусах удалённой работы, и почему гибридный режим лучше всего.]]></summary></entry><entry><title type="html">Code review. Всё, что нужно знать.</title><link href="https://www.vladkhambir.com/posts/code-review/" rel="alternate" type="text/html" title="Code review. Всё, что нужно знать." /><published>2021-05-25T16:00:00-04:00</published><updated>2021-05-25T16:00:00-04:00</updated><id>https://www.vladkhambir.com/posts/code-review</id><content type="html" xml:base="https://www.vladkhambir.com/posts/code-review/"><![CDATA[<p>Два инженера, которые смотрят код, ищут пути его улучшения, делятся своим опытом — этот замечательный процесс называется Code review. Именно эту неотъемлемую часть жизни разработчика я хочу разложить по полочкам. В этой статье я опишу как провести Code review, на что обратить внимание, как сделать этот процесс более эффективным.</p>

<p>А начнем мы с главного — обсудим зачем вообще нужно Code review.</p>

<h1 id="какой-профит-">Какой профит? 🎯</h1>

<p>Code review создано не только для улучшения кода, это социальный процесс, в котором принимают участие коллеги с двумя ролями — автор и ревьювер.</p>

<p>Вы можете делать друг друга лучше, так как каждый делится своим опытом и мнением. Это позволяет быстро обучаться, находить пробелы в знаниях и стремительно их заполнить.</p>

<blockquote>
  <p><strong>Ловушка</strong></p>

  <p>Code review стоит воспринимать исключительно в положительном ключе. Все плюсы могут быть утеряны, если автор воспринимает обсуждение как критику.</p>
</blockquote>

<h1 id="какой-процесс-проведения-code-review">Какой процесс проведения Code review?</h1>

<p>Перед началом ревью я рекомендую создать документ в котором будут записываться список <strong>рекомендаций</strong> от ревьювера.</p>

<p>🔄 Code-review — процесс итерационный и на каждой итерации происходит следующее:</p>

<ol>
  <li>Автор делится кодом</li>
  <li>Ревьювер смотрит код, формирует фидбек и отправляет его автору</li>
  <li>Автор реагирует на фидбек уточняющими комментариями или изменениями в коде и снова отдает код на ревью.</li>
</ol>

<p>⚽️ Такая игра в пас приведет к чистому коду и шарингу знаний, все в плюсе.</p>

<p>Не забываем есть слона по кусочкам, так как если мы имеем дело с большим куском кода — лучше провести ревью небольшого участка кода, разобраться со всем что нашли и  переходить к следующему куску <del>слона</del> кода.</p>

<h2 id="как-писать-фидбек">Как писать фидбек?</h2>

<p>Фидбек должен быть изложен как <strong>рекомендации, а не команды</strong> к выполнению.</p>

<p>Рекомендации лучше команд, потому что это дает право последнего слова. И вполне возможно, что если аргументы автора будут сильны — в продакшн пойдет именно его реализация поставленной задачи.</p>

<p>Круто, если ревьювер предоставляет наброски кода, возможно даже <a href="https://ru.wikipedia.org/wiki/Проверка_концепции">proof of concept</a> того как бы он решил поставленную задачу.</p>

<h2 id="критикуем-код-а-не-кодера">Критикуем код, а не кодера.</h2>

<p>Цель Code review — сделать код лучше, а не найти виновных. 
Чтобы повысить командный дух и понизить напряжение — используй слово <strong>Мы</strong>, вместо <strong>Ты</strong>. Нужно размыть конкретику о том кто написал код, гораздо важнее сосредоточится на решении проблем, которые были найдены в коде.</p>

<p>Кстати, в коде нужно искать не только проблемы, а и положительные моменты. За элегантные решения, грамотное программирование ревьювер может похвалить автора 👍</p>

<h2 id="one-more-thing-совет-️">One more <del>thing</del> совет ☝️</h2>

<p>Настоятельно рекомендую время от времени менять ревьюверов. Это позволит получить новый взгляд и опыт для всех сторон.</p>

<h1 id="на-что-обращать-внимание-">На что обращать внимание? 🧐</h1>

<p>Руководствуясь <a href="https://google.github.io/eng-practices/review/">рекомендациями от Google по проведению Code Review</a>, можно выделить следующие пункты на которые нужно обратить внимание при Core Review:</p>

<ul>
  <li>Дизайн: хорошо ли спроектирован и вписывается ли код в вашу систему?</li>
  <li>Функциональность: ведет ли код так, как предполагал автор? Подходит ли эта реализация для выполнения поставленной задачи?</li>
  <li>Сложность: можно ли сделать код проще? Сможет ли другой разработчик легко понять и использовать этот код, когда он встретится с ним в будущем?</li>
  <li>Тесты: покрыт ли новый функционал тестами?</li>
  <li>Именование: выбрал ли разработчик четкие имена для переменных, классов, методов и т. д.?</li>
  <li>Комментарии: комментарии понятны и <strong>полезны</strong>?</li>
  <li>Стиль: соответствует ли код принятым у вас стайлгайдам?</li>
  <li>Документация: обновил ли разработчик соответствующую документацию (CHANGELOG, как минимум)?</li>
</ul>

<h1 id="где-срезать-углы-">Где срезать углы? 📐</h1>

<p>Практики, которые помогут сократить время, затраченное на ревью:</p>

<ul>
  <li>Устранение ошибок <strong>до ревью</strong>. Проверяй свой код самостоятельно, велика вероятность, что еще до ревью ты сам найдешь пути для улучшения. Проверив код самостоятельно, ты экономишь время ревьювера, он этого не забудет ☺️</li>
  <li>Создай со своей командой стайлгайд и усовершенствуйте его итеративно. Стайлгайд положит конец спорам во время Code review о нейминге, комментариях и т.д.</li>
  <li>Не запаривайтесь над мелочами, сконцентрируйтесь на интересных вещах. Пусть за форматирование и прочее беспокоится автоматизированный анализатор и форматтер кода, а не ревьювер с автором. Сэкономленное время лучше потратить на тимбилдинг 🍻</li>
  <li>Правильные сообщения в коммитах помогут быстро влиться в контекст. Не забывайте, что сообщение коммита — часть документации для ревью ☝️</li>
</ul>

<h1 id="заключение-">Заключение 🔑</h1>

<p>Мы с тобой определили, что Code review помогает программисту развиваться. Критика — плохо, а рекомендации — хорошо.</p>

<p>Еще мы выделили перечень моментов на которые стоит обращать внимание во время Code review и определили как можно оптимизировать этот процесс. Этих знаний будет вполне достаточно, чтобы проводить здоровое Code review от которого все будут только в плюсе ➕</p>

<h1 id="куда-дальше-">Куда дальше? 🛣</h1>

<p>Самое время написать стайлгайд для своего проекта или же подумать над интеграцией автоматического анализа и форматирования кода. А возможно кому-то стоит переосмыслить Code review и начать воспринимать его более положительно, что позволит получить наслаждение от каждой сессии Code review 🤘</p>]]></content><author><name>Vlad Khambir</name><email>vlad.khambir@gmail.com</email></author><category term="Практики" /><category term="Engineering" /><summary type="html"><![CDATA[Как провести Code Review, на что обратить внимание и как сделать этот процесс более эффективным.]]></summary></entry><entry><title type="html">Скромный объект. Шаблон, который используют все.</title><link href="https://www.vladkhambir.com/posts/humble-object/" rel="alternate" type="text/html" title="Скромный объект. Шаблон, который используют все." /><published>2021-05-16T09:00:00-04:00</published><updated>2021-05-16T09:00:00-04:00</updated><id>https://www.vladkhambir.com/posts/humble-object</id><content type="html" xml:base="https://www.vladkhambir.com/posts/humble-object/"><![CDATA[<p>Во время чтения книги <a href="https://www.amazon.com/Clean-Code-Handbook-Software-Craftsmanship/dp/0132350882">Чистая архитектура от Боба Мартина</a>, наткнулся на шаблон о котором ранее не слыхал… Очень удивился, когда я понял, что я использовал его всегда 😲</p>

<p>Этот скромный шаблон имеет не менее скромное название - “Скромный объект”. Если ранее ты тоже не слыхал о таком паттерне - продолжай читать.</p>

<h1 id="что-это-за-скромняга-и-какую-проблему-он-решает-️">Что это за скромняга и какую проблему он решает? ☺️</h1>

<p>При написании тестов, мы часто сталкиваются с проблемой тестирования компонентов, которые тесно связаны с каким-то фреймворком (UI, конкретные базы данных, зависимости типа Facebook, Firebase и т.д.). Тестирование таких объектов очень неудобное из-за сложности или даже невозможности создания зависимостей, которые необходимы нашему объекту для работы.</p>

<p>И решить эту проблему может <del>лень из-за которой ты не пишешь тесты</del> паттерн “Скромный объект”, который позволяет протестировать логику этих сложных для создания экземпляров объектов.</p>

<h1 id="как-это-работает-">Как это работает? 🤔</h1>

<p>🎯 Цель — разделить поведение на два класса:</p>

<ul>
  <li>“Скромный” класс, который будет содержать все, что с трудом поддается тестированию, в упрощенном до предела виде.</li>
  <li>Второй класс, который будет содержать все, что было выброшено из “скромного” класса.</li>
</ul>

<p>В итоге мы получаем <em>Скромный Объект</em>, который очень прост, содержит на столько мало кода и работает так прозрачно, что нам даже не нужно покрывать его тестами. Зато второй объект (нескромный) теперь не содержит зависимостей, которые трудно создать, что позволяет легко покрыть его тестами.</p>

<p>Скромный класс можно закрыть интерфейсом и легко подменять его в тестах “нескромного” класса.</p>

<h1 id="примеры-использования-паттерна-">Примеры использования паттерна 🧑‍💻</h1>

<h2 id="использование-в-архитектурном-паттерне-mvp">Использование в архитектурном паттерне MVP</h2>

<p>MVP (Model-View-Presenter) во всю использует шаблон «Скромный объект». Можно разделить два вида поведения на два разных класса: View и Presenter.</p>

<p>Представление (View) — это “скромный” объект, UI зависимый код, который сложный для тестирования. Код в этом объекте должен быть максимально простым. Он просто переносит данные в графический интерфейс, никак не обрабатывая их.</p>

<p>Presenter — это легко тестируемый объект с четко определенной задачей - получить данные и преобразовать их для отображения на View.</p>

<h2 id="обертка-над-базой-данных">Обертка над базой данных</h2>

<p>Допустим настал тот день, когда ты решил(а) <del>уйти с айти</del>  затянуть базу данных в свое приложение. В iOS, это может быть CoreData или Realm, но это детали от которых нужно избавиться для того, что бы покрыть нашу бизнес-логику тестами и не заботиться о том какая база данных используется под капотом.</p>

<p>Использование CoreData или Realm нужно сделать максимально скромным, держать код простым, например реализовать только методы CRUD.</p>

<blockquote>
  <p>CRUD — четыре базовые функции, используемые при работе с базами данных: создание (create), чтение (read), модификация (update), удаление (delete)</p>
</blockquote>

<p>Весь остальной код, связанный с бизнес-правилами, характерными для приложения (получение списка сообщений, используя скромный объект) стоит держать отдельно, так как данный код не является скромным, легко поддается тестированию и может использовать <em>скромный объект</em> для совершения CRUD операций.</p>

<h1 id="заключение-">Заключение 🔑</h1>

<p>Несмотря на свою скромность, шаблон “Скромный объект” так или иначе используется каждым из нас. Паттерн поможет повысить тестируемость и модульность путем выделения тяжело тестируемого кода в отдельный “скромный” класс, оставшийся код просто остается в текущем классе и его можно легко протестировать.</p>

<h1 id="куда-дальше-">Куда дальше? 🛣</h1>

<p>Уверен, что в твоем проекте есть парочку классов-монстров, которые сложны в тестировании и далеко не скромны по своим возможностям. Самое время разобраться с этим, используя паттерн “Скромный объект” 😉</p>]]></content><author><name>Vlad Khambir</name><email>vlad.khambir@gmail.com</email></author><category term="Шаблоны" /><category term="Architecture" /><category term="Testing" /><summary type="html"><![CDATA[Паттерн "Скромный объект" из книги "Чистая архитектура": как повысить тестируемость кода.]]></summary></entry></feed>