
Switching to SwiftUI in a large codebase can feel risky. But remember how we once moved from Objective-C to Swift? From RxSwift to Combine? Now it’s time to move from UIKit to SwiftUI. In this article, I’ll share my migration strategy called From Leaves to Root, explain the benefits of SwiftUI, and give practical advice for managing the transition inside a team.
Why SwiftUI
SwiftUI is a modern UI framework designed to replace UIKit. Here are a few key reasons to move forward:
- Declarative syntax that makes UI easier to reason about
- Smaller and cleaner codebase with better readability
- Growing support from Apple
Migration Strategy: From Leaves to Root
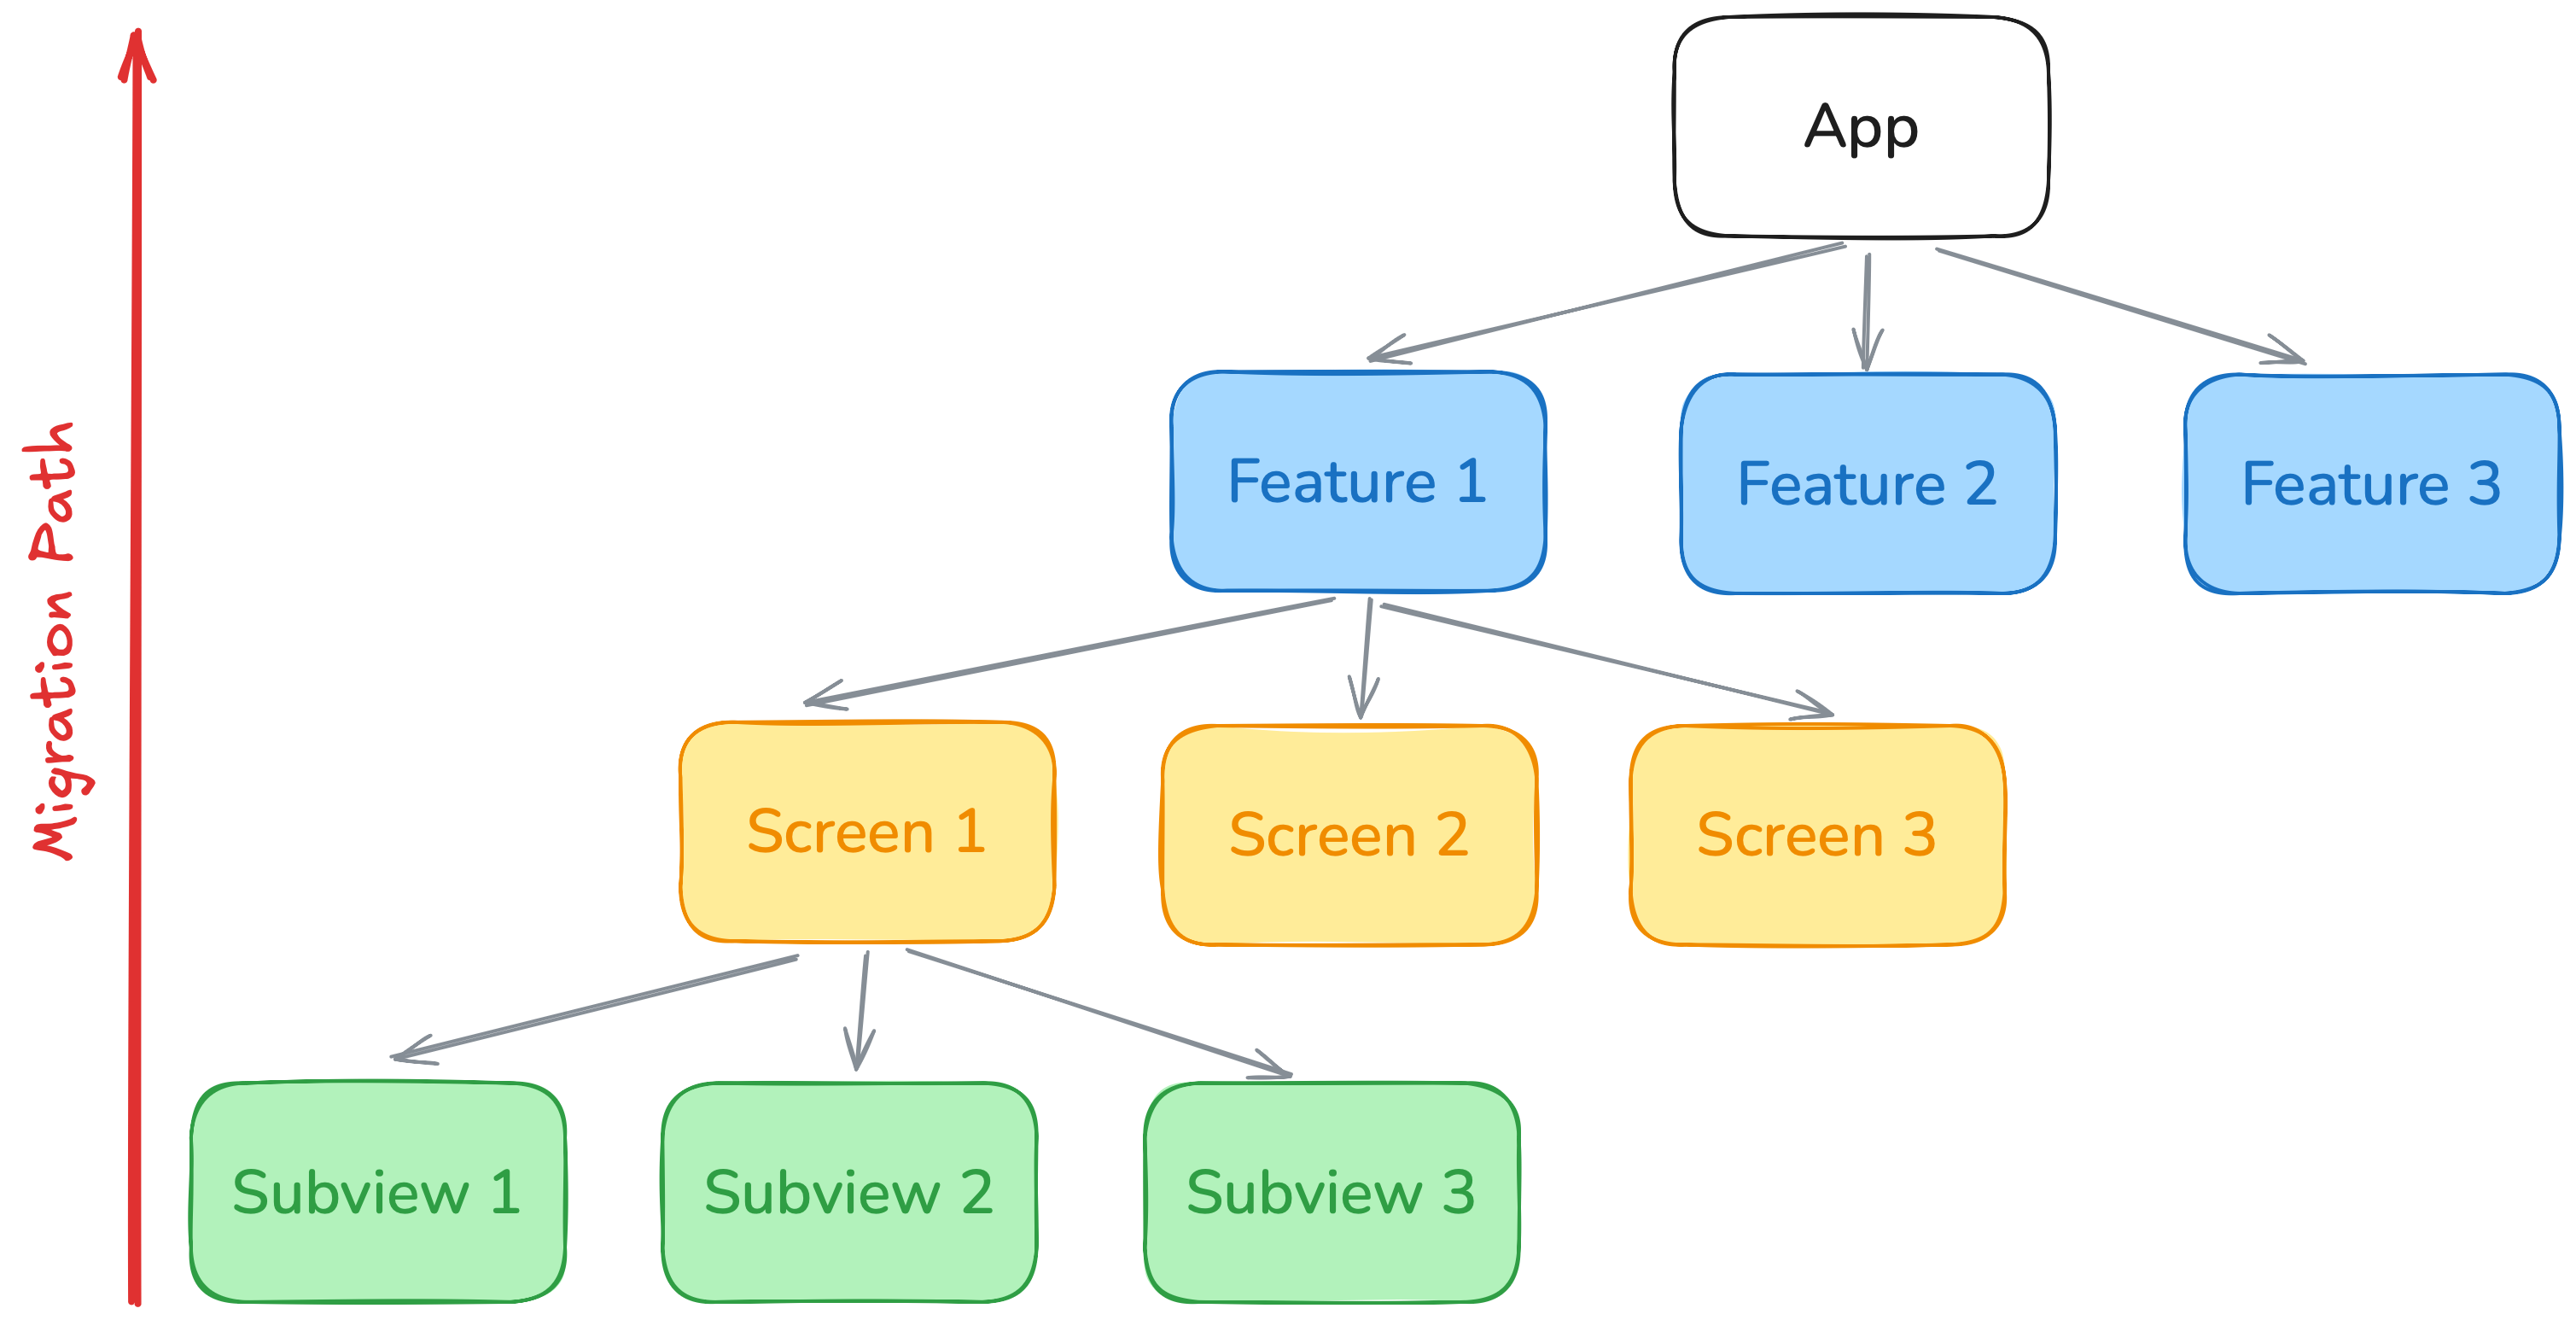
Every app consists of features, each feature includes screens, and every screen has multiple subviews. That’s where the idea From Leaves to Root comes from.
- Start with subview - these are the easiest to migrate and reuse.
- Then migrate individual screens that use these subviews.
- Once screens are ready, group them into features or user flows.
- Finally, migrate the main app structure and root navigation.
This way, you reduce the risk and ensure that every level of the app is prepared before moving deeper.
Getting Started with the Design System
The first and most important step is to migrate the design system. You need to create SwiftUI components that can be used both in SwiftUI and UIKit. Two techniques help:
- Use UIHostingController to wrap SwiftUI views and use them inside UIKit.
- Use UIViewRepresentable or UIViewControllerRepresentable to wrap UIKit components for SwiftUI.

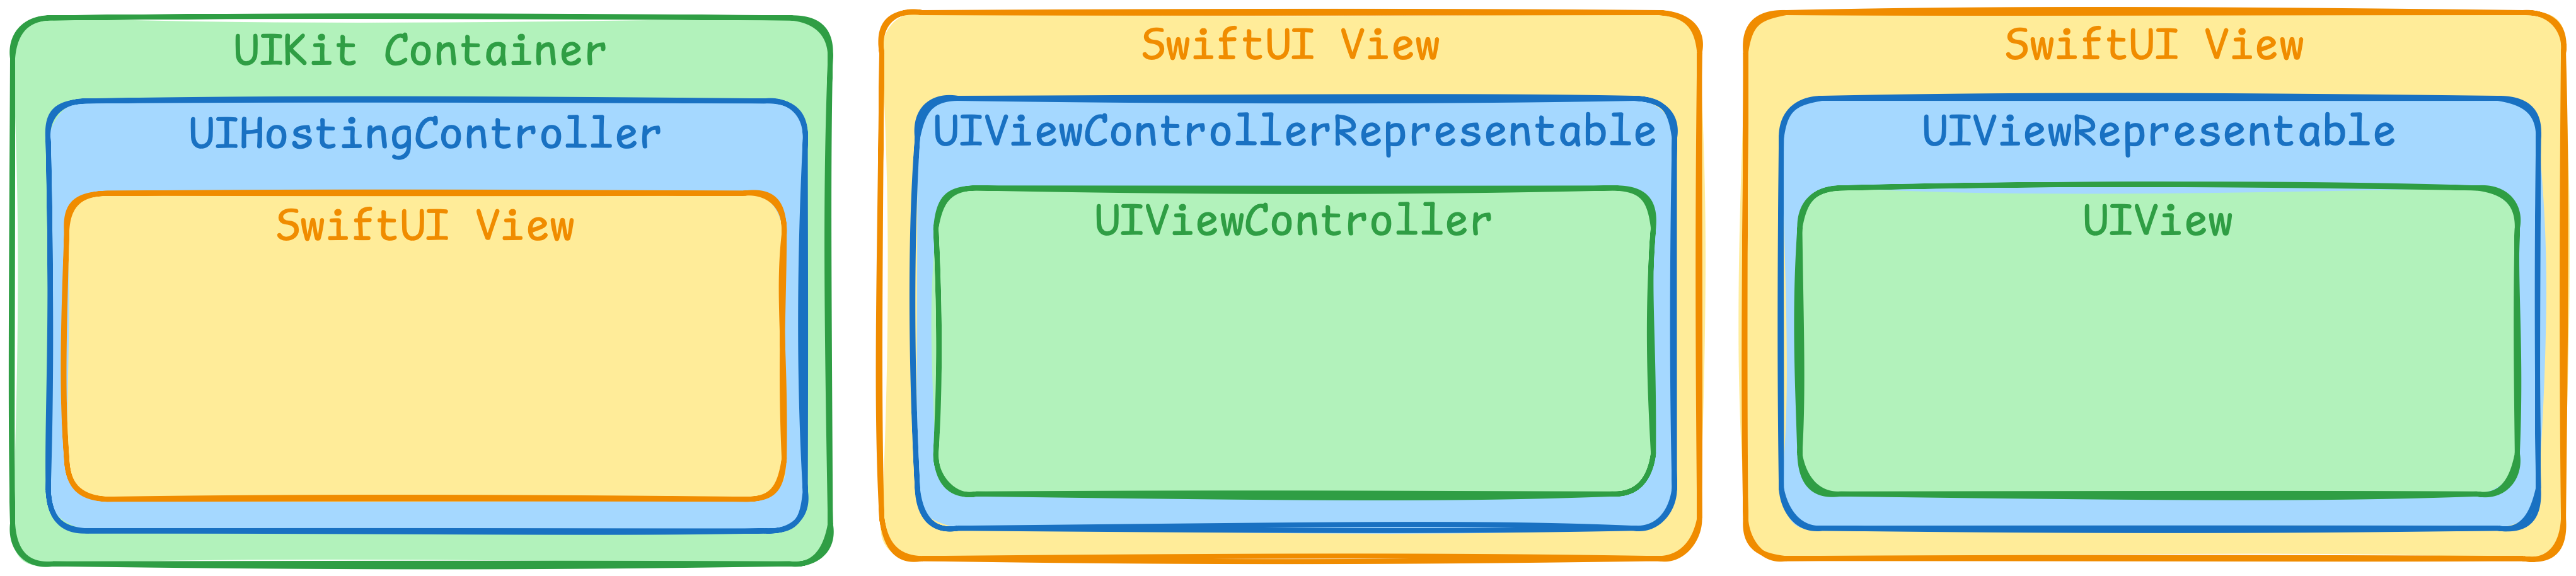
This compatibility layer will allow you to slowly introduce SwiftUI components into the existing codebase.
Example: Migrating a Custom Button from UIKit to SwiftUI
Let’s say you have a custom button in your design system. Right now, it’s written with UIKit and used only in UIKit screens. This is a great candidate for starting migration; it’s a reusable view, a classic “leaf” in the UI tree.
Step 1: Create a Shared Configuration
First, define a shared configuration model. This struct will be used both by UIKit and SwiftUI.
1
2
3
4
struct CustomButtonConfiguration {
    let title: String
    let action: () -> Void
}
This way, you can keep the button logic and appearance consistent across platforms.
Step 2: Build the SwiftUI View
Now let’s create a SwiftUI view that renders the button using this configuration.
1
2
3
4
5
6
7
struct CustomButton: View {
    let config: CustomButtonConfiguration

    var body: some View {
        Button(configuration.title, action: config.action)
    }
}
Now you can use this SwiftUI view in all new SwiftUI screens.
Step 3: Make It Available in UIKit
To use this SwiftUI button in UIKit, you can wrap it with UIHostingController.
1
2
3
4
5
6
7
8
9
10
11
12
13
14
15
16
17
18
19
20
21
22
23
24
25
26
27
28
class CustomButtonView: UIView {
    private let hostingController: UIHostingController<CustomButton>

    init(config: CustomButtonConfiguration) {
        let swiftUIButton = CustomButton(config: config)
        self.hostingController = UIHostingController(rootView: swiftUIButton)
        super.init(frame: .zero)

        setup()
    }

    required init?(coder: NSCoder) {
        fatalError("init(coder:) has not been implemented")
    }

    private func setup() {
        let hostedView = hostingController.view!
        hostedView.translatesAutoresizingMaskIntoConstraints = false
        addSubview(hostedView)

        NSLayoutConstraint.activate([
            hostedView.topAnchor.constraint(equalTo: topAnchor),
            hostedView.bottomAnchor.constraint(equalTo: bottomAnchor),
            hostedView.leadingAnchor.constraint(equalTo: leadingAnchor),
            hostedView.trailingAnchor.constraint(equalTo: trailingAnchor)
        ])
    }
}
This class allows you to use the new SwiftUI button in any UIKit screen by simply passing the same shared configuration.
Summary
With this pattern:
- SwiftUI screens use
CustomButtondirectly - UIKit screens use
CustomButtonView - Both share the same
CustomButtonConfiguration
This is a clean and practical example of migrating a leaf, and it keeps your design system consistent across your codebase.
Gradual Replacement of Screens
Start with low-risk screens, such as:
- Settings
- About pages
- Simple informational views
Once these are stable, continue with more important flows. Leave your core flows for the final stage, after the team has gained confidence. During the process, rely on bridges between UIKit and SwiftUI. You don’t need to migrate everything at once. Use what works best in each case.
Managing the Migration Inside the Team
Large migrations are never just about code. They are also about team culture, support, and documentation. Here’s what helps:
- Create a dedicated Slack channel for SwiftUI questions
- Schedule office hours with SwiftUI experts
- Run workshops and record sessions
- Build tutorials on lifecycle, previews, and state management
- Define a SwiftUI style guide
- Set up pre-commit hooks to enforce coding standards
- Offer onboarding tools: code snippets, screen templates, reusable components
- Run regular review sessions to share the migration experience
- Require approval for using SwiftUI in new features, with clear documentation
- Create a SwiftUI Adoption Team to review implementation quality
- Use a separate
GitHublabel for SwiftUI pull requests
These steps help create a supportive environment and improve the quality of SwiftUI code across the company.
Automated Testing with SwiftUI
The good news: you don’t need to rewrite all your tests. Because SwiftUI supports accessibility identifiers just like UIKit, you can reuse your existing UI tests. This reduces regression risks and gives confidence that your migration didn’t break the user experience.
1
2
3
4
5
6
7
Button("Login") {
  // action
}
.accessibilityIdentifier("login_button")

let button = app.buttons["login_button"]
XCTAssert(button.exists)
Use the same identifiers for buttons, labels, and inputs. The test scripts will continue to work even after the screens are fully rewritten in SwiftUI.
Preview Reliability
SwiftUI previews are helpful but not always reliable. They can break, crash, or show outdated results. To improve trust in your previews:
- Add snapshot tests to track changes
- Use snapshots to detect unwanted UI modifications
- Treat snapshots as a safety net for design consistency
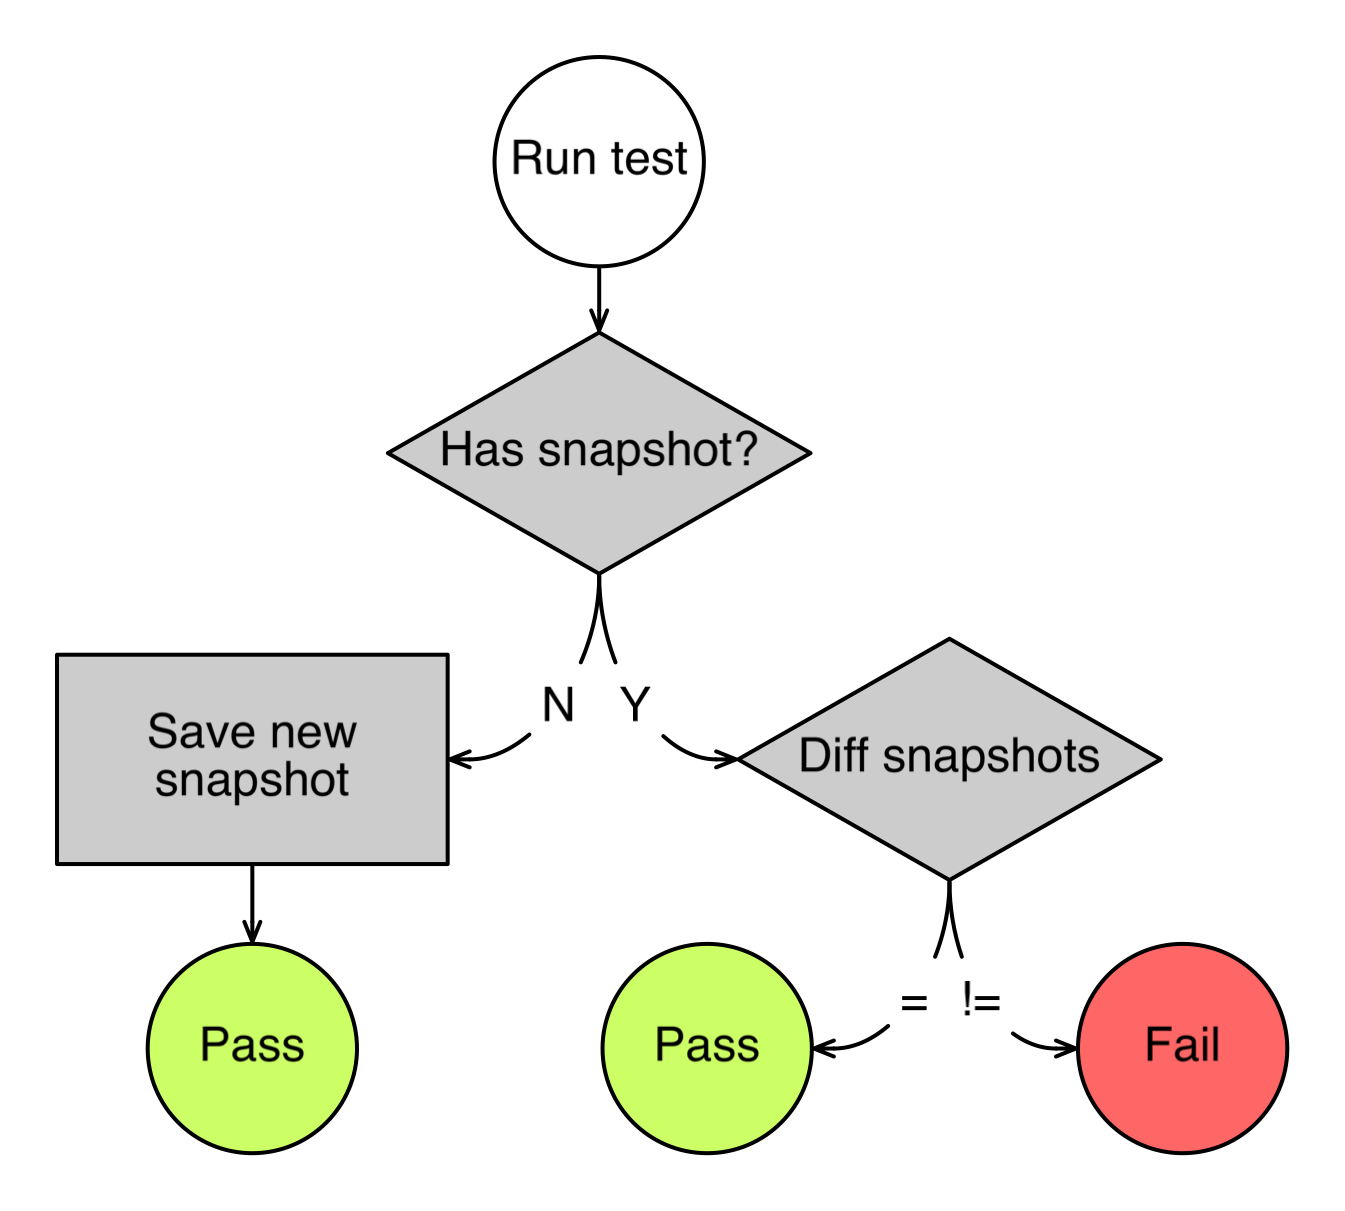
This approach will help you maintain accurate previews and avoid last-minute surprises in production.
Conclusion
Migrating to SwiftUI is a big step, but with the right strategy, it becomes manageable. Start with subviews, build your foundation, and move step-by-step toward the full transition.
Try creating your first SwiftUI component and wrapping it with UIHostingController. Migrate a simple screen. Build confidence, and let the team grow together with the framework.
If you enjoyed this article and want to receive more practical tips like this, consider subscribing to The iOS Weekly Brief — my weekly Substack newsletter for iOS engineers. Every week, I share handpicked updates, tools, and insights from the iOS world, focused on real production needs.
You can read it in 5 minutes and stay up to date without spending hours watching every video or reading every changelog.
Join hundreds of iOS developers already following it: vladkhambir.substack.com